A structured 6-stage course that takes you from your very first cockpit check to test day. Every lesson uses the same routines and clear diagrams your instructor uses in the car, so what you read here and what you do behind the wheel line up perfectly.
We teach the way good instruction works in the car: you understand why before you practise the how, then you reflect on what to improve next time. Tick off each lesson as you master it. Your progress is saved on this device.
🎯
Clear objective
Each lesson starts with exactly what you should be able to do by the end. No vague goals.
🧭
One set of routines
Everything hangs off two routines, POM and MSPSL. Master them once and every junction, roundabout and manoeuvre becomes the same familiar pattern.
📐
See it, then drive it
Diagrams show road position, observation and timing the way you'll actually meet them on the road.
💭
Reflect & improve
Reflection questions after each lesson help you turn a drive into real learning. That's the heart of client-centred coaching.
The two routines that run through everything
If you only memorise two things before your first lesson, make it these. Almost every hazard you meet is handled with one of them.
POM
Used to move the car: pulling away, moving off at an angle, starting to reverse
PPrepareGet the car ready to move: gear/Drive selected, gas & clutch set to the biting point (manual).
OObserveFull all-round check, mirrors and blind spots. Decide if a signal is needed.
MManoeuvreMove only when it's safe; release the parking brake, steer a safe line, then cancel the signal & re-check mirrors.
MSPSL
Used to negotiate hazards: junctions, roundabouts, parked cars, crossings, changing lanes
MMirrorsCheck the relevant mirrors early to know what's behind and beside you.
SSignalIn good time. Not so early it misleads, not so late it's useless.
PPositionMove to the correct part of the road for what you're about to do.
SSpeedAdjust speed (and gear) so you arrive able to act on what you see.
LLookLook, assess, decide, act, then go only when it's safe.
The course
Work through the stages in order. Each one builds on the skills before it. Click any lesson to open it, then tick it off when you can do it confidently.
1
Getting ready to drive
Before the wheels move: getting set up, knowing the controls, and pulling away.
✓
LESSON 1
Cockpit checks & getting in safely
▼
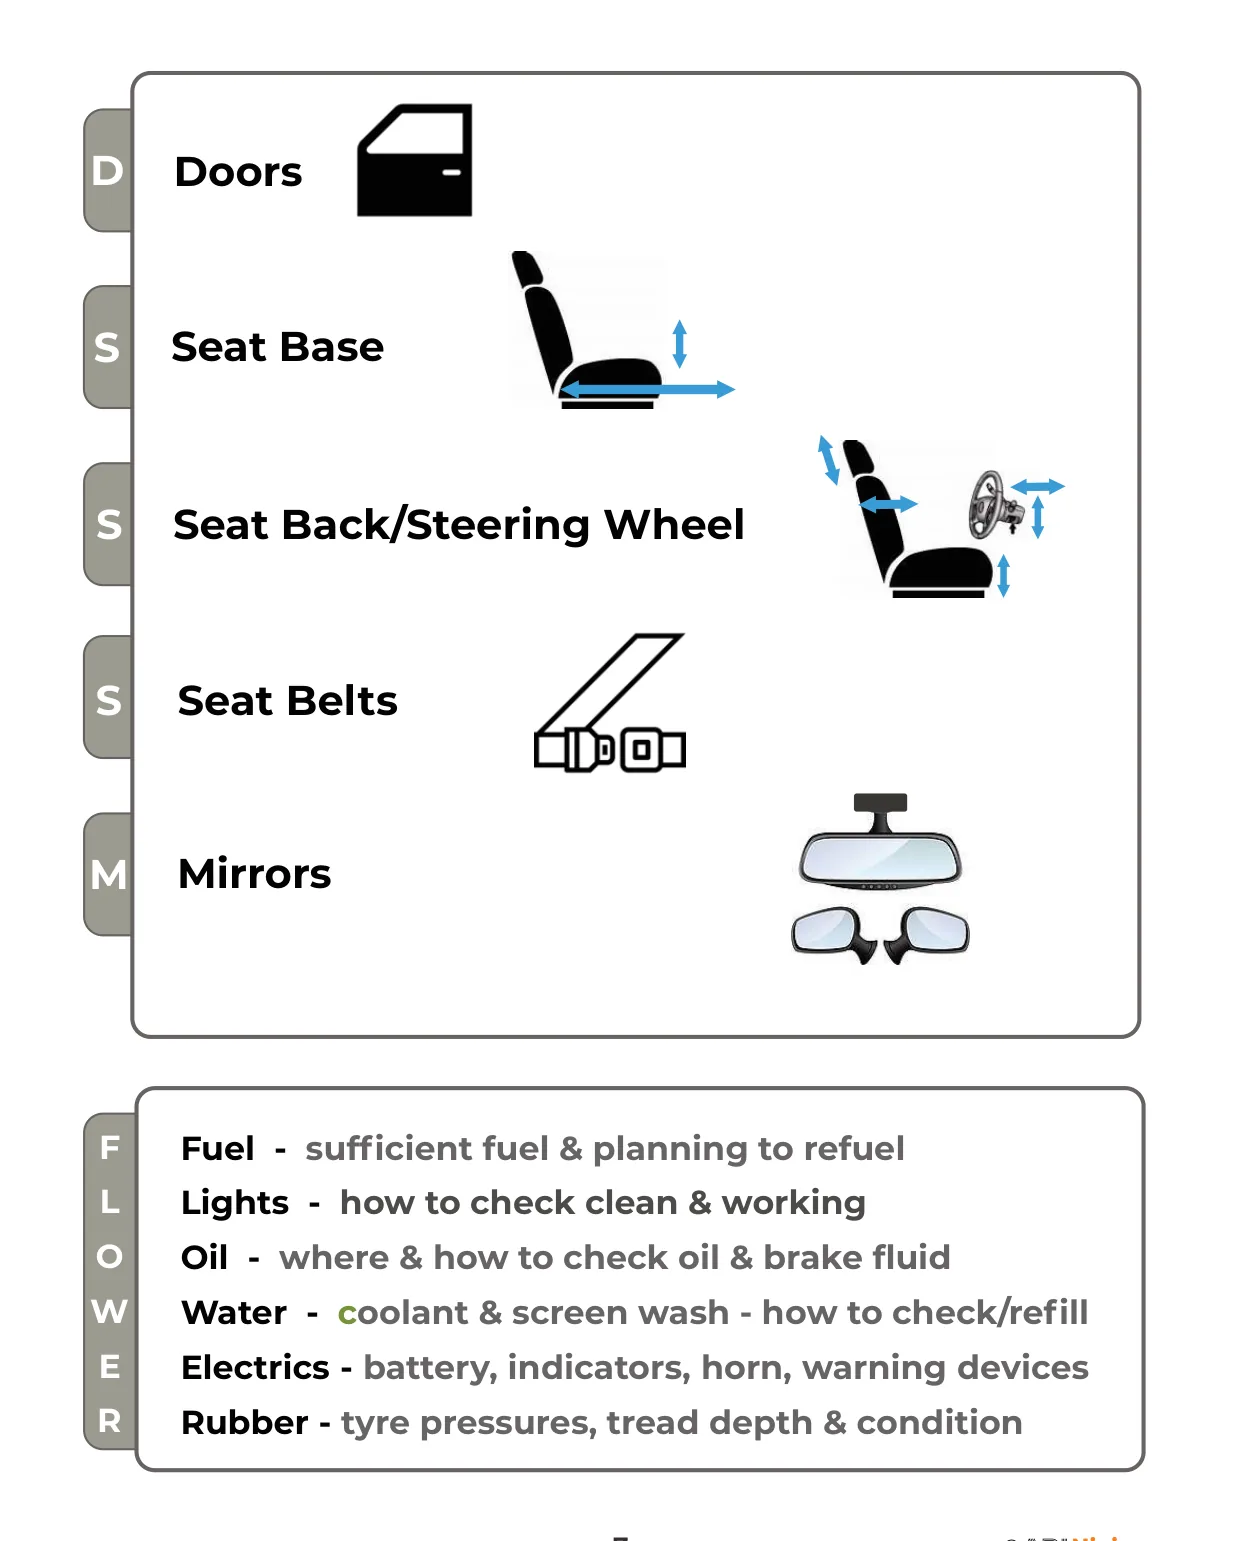
Objective: Get into and out of the car safely, and set yourself up correctly every time using the DSSSM cockpit drill.
The cockpit drill: what to check, in order, before every drive.
Key teaching points
Get in safely. Approach from the kerb side where you can, check for traffic and cyclists before opening your door, and open it only as wide as you need.
D for doors. Make sure all doors are properly closed (a warning light or a slightly open door tells you if not).
S for seat base. Slide forward/back so you can press the clutch (or brake) fully to the floor with a slight bend in the knee.
S for seat back & head restraint. Upright enough that your wrist rests on the top of the wheel with arms slightly bent; head restraint level with the top of your head.
S for seat belt. Flat across the hips and shoulder, no twists. The driver is legally responsible for passengers under 17 being correctly restrained.
M for mirrors. Adjust all three now, never on the move. (Full mirror setup is Lesson 4.)
Reflect
How can you tell the seat is in the right position for you?
Which road users are most at risk if you open your door without looking?
Why must mirrors be set before you move, not while driving?
🚗 On the road: Run DSSSM out loud every single time until it's automatic. Examiners expect it to look like second nature.
✓
LESSON 2
The controls: hands & feet
▼
Objective: Identify every major control, know what it does, and use the foot controls smoothly and progressively.
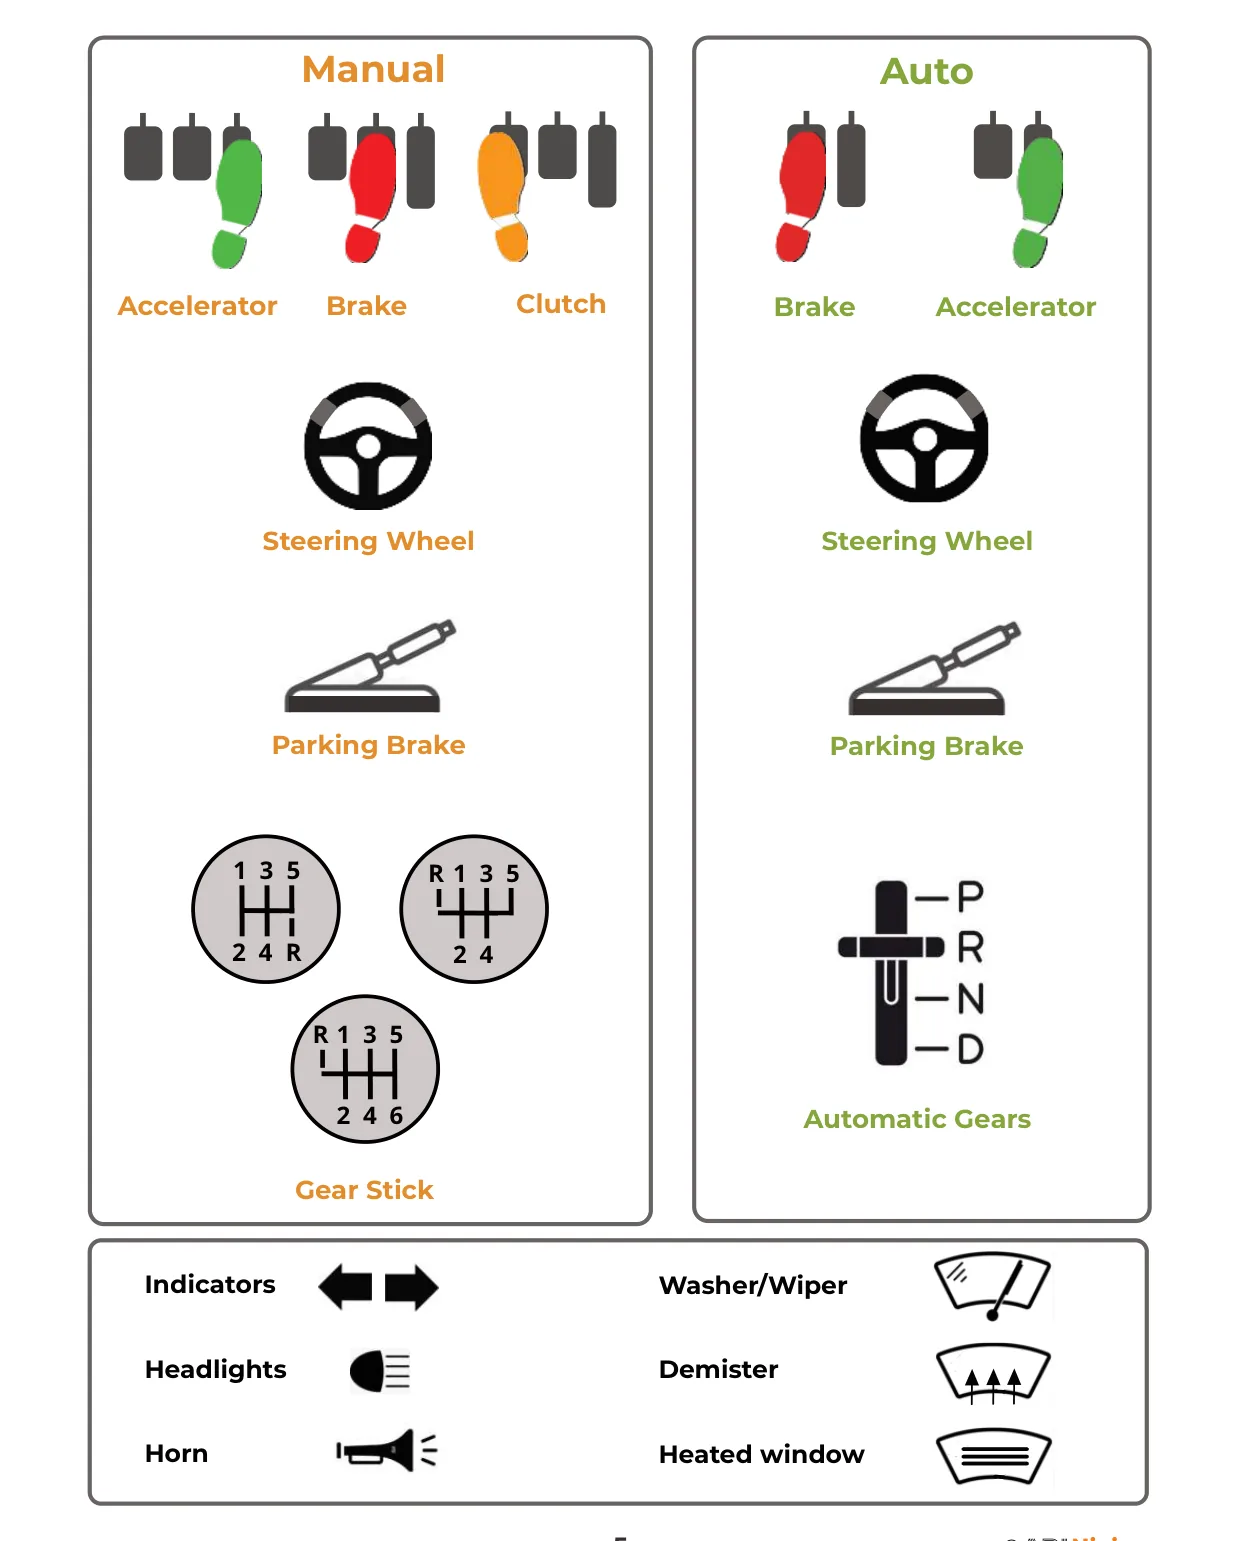
The car's main hand and foot controls.
Key teaching points
Hand controls: steering wheel, indicators, gear lever (or selector), parking/hand brake, horn, lights, wipers. Find each without looking down.
Accelerator ("gas"): right foot, used gently. Small movements change speed a lot. Easing off slows the car without braking.
Foot brake: right foot, progressive braking: squeeze on gently, increase if needed, then ease off just before you stop for a smooth halt.
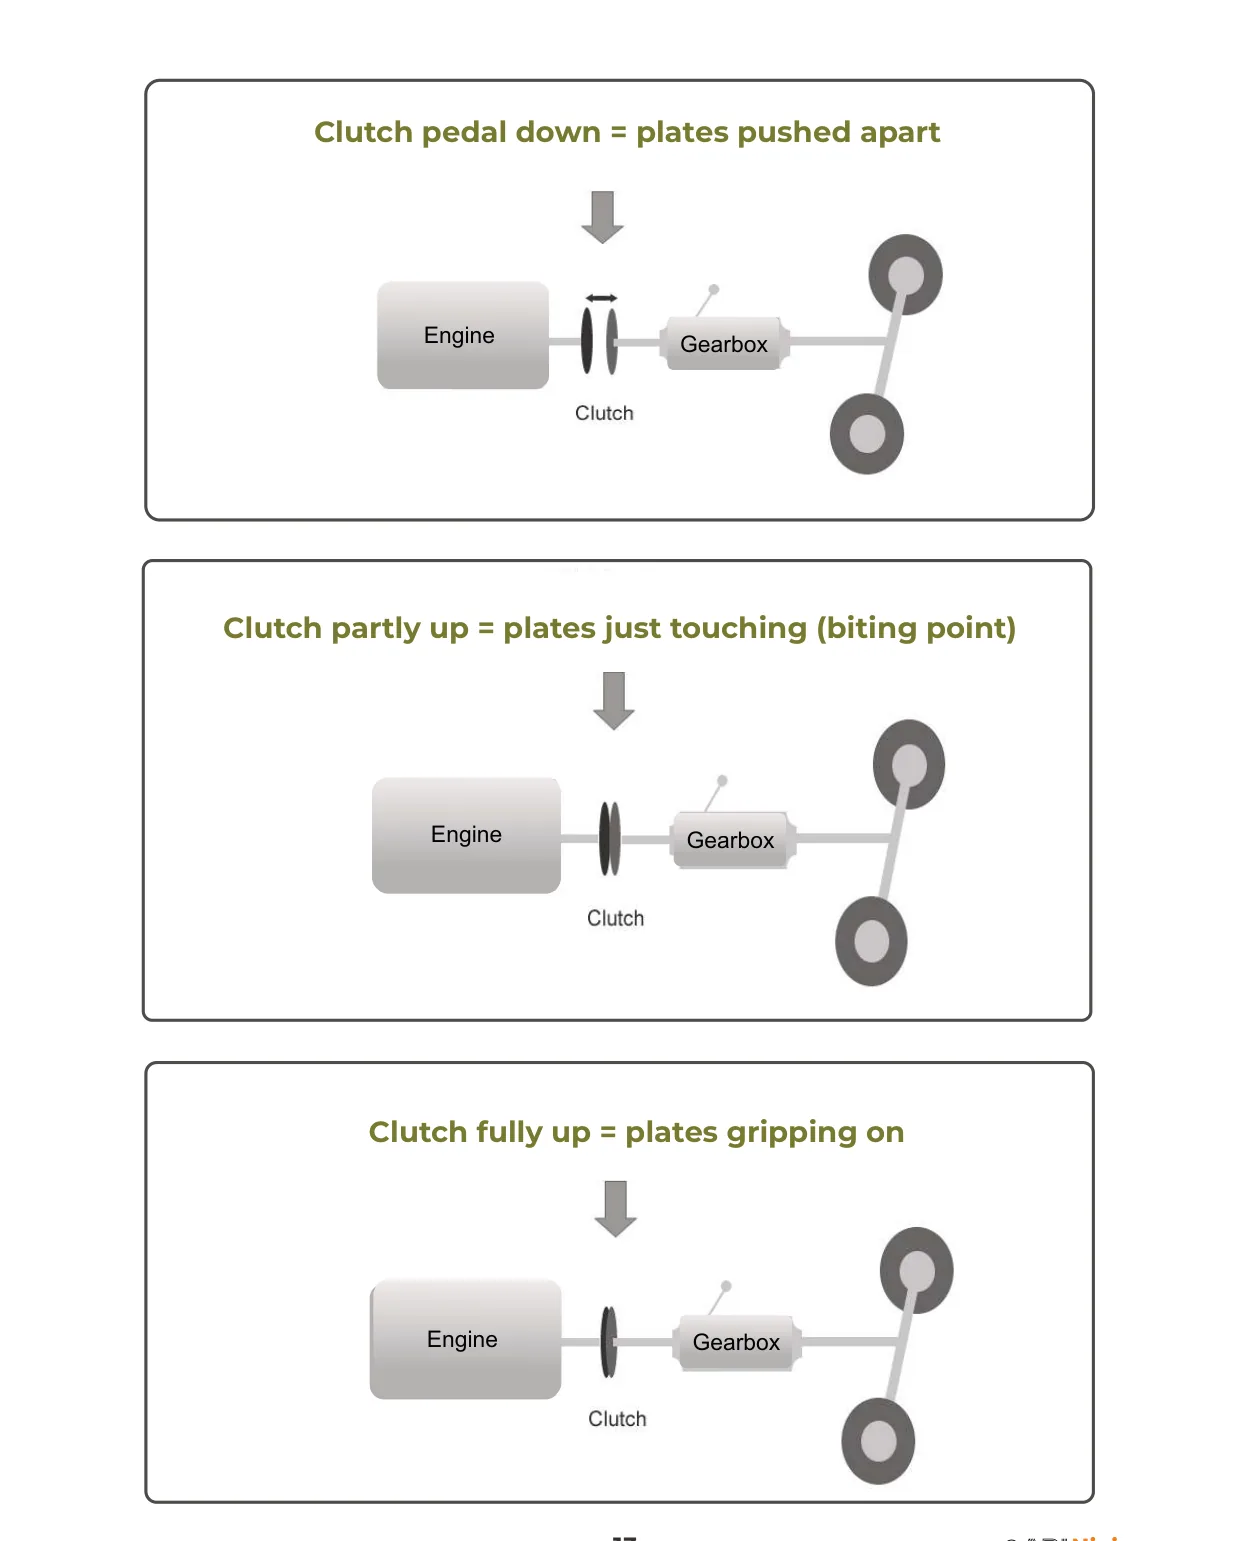
Clutch (manual): left foot, connects/disconnects the engine from the wheels. It's the key to smooth moving off and gear changes.
Footwear matters: thin, secure soles give the best feel; avoid heavy boots, flip-flops or driving barefoot.
Reflect
Why use the foot brake rather than the parking brake to slow down?
What does "progressive braking" mean, and why is it safer and smoother?
How could the wrong footwear affect your control?
🚗 On the road: Practise "covering" the brake and feeling the bite of the gas with the car stationary and the engine running before you ever move.
✓
LESSON 3
Moving off & stopping (POM)
▼
Objective: Pull away from the kerb safely and under full control using POM, and bring the car to a smooth, safe stop using MSPSL.
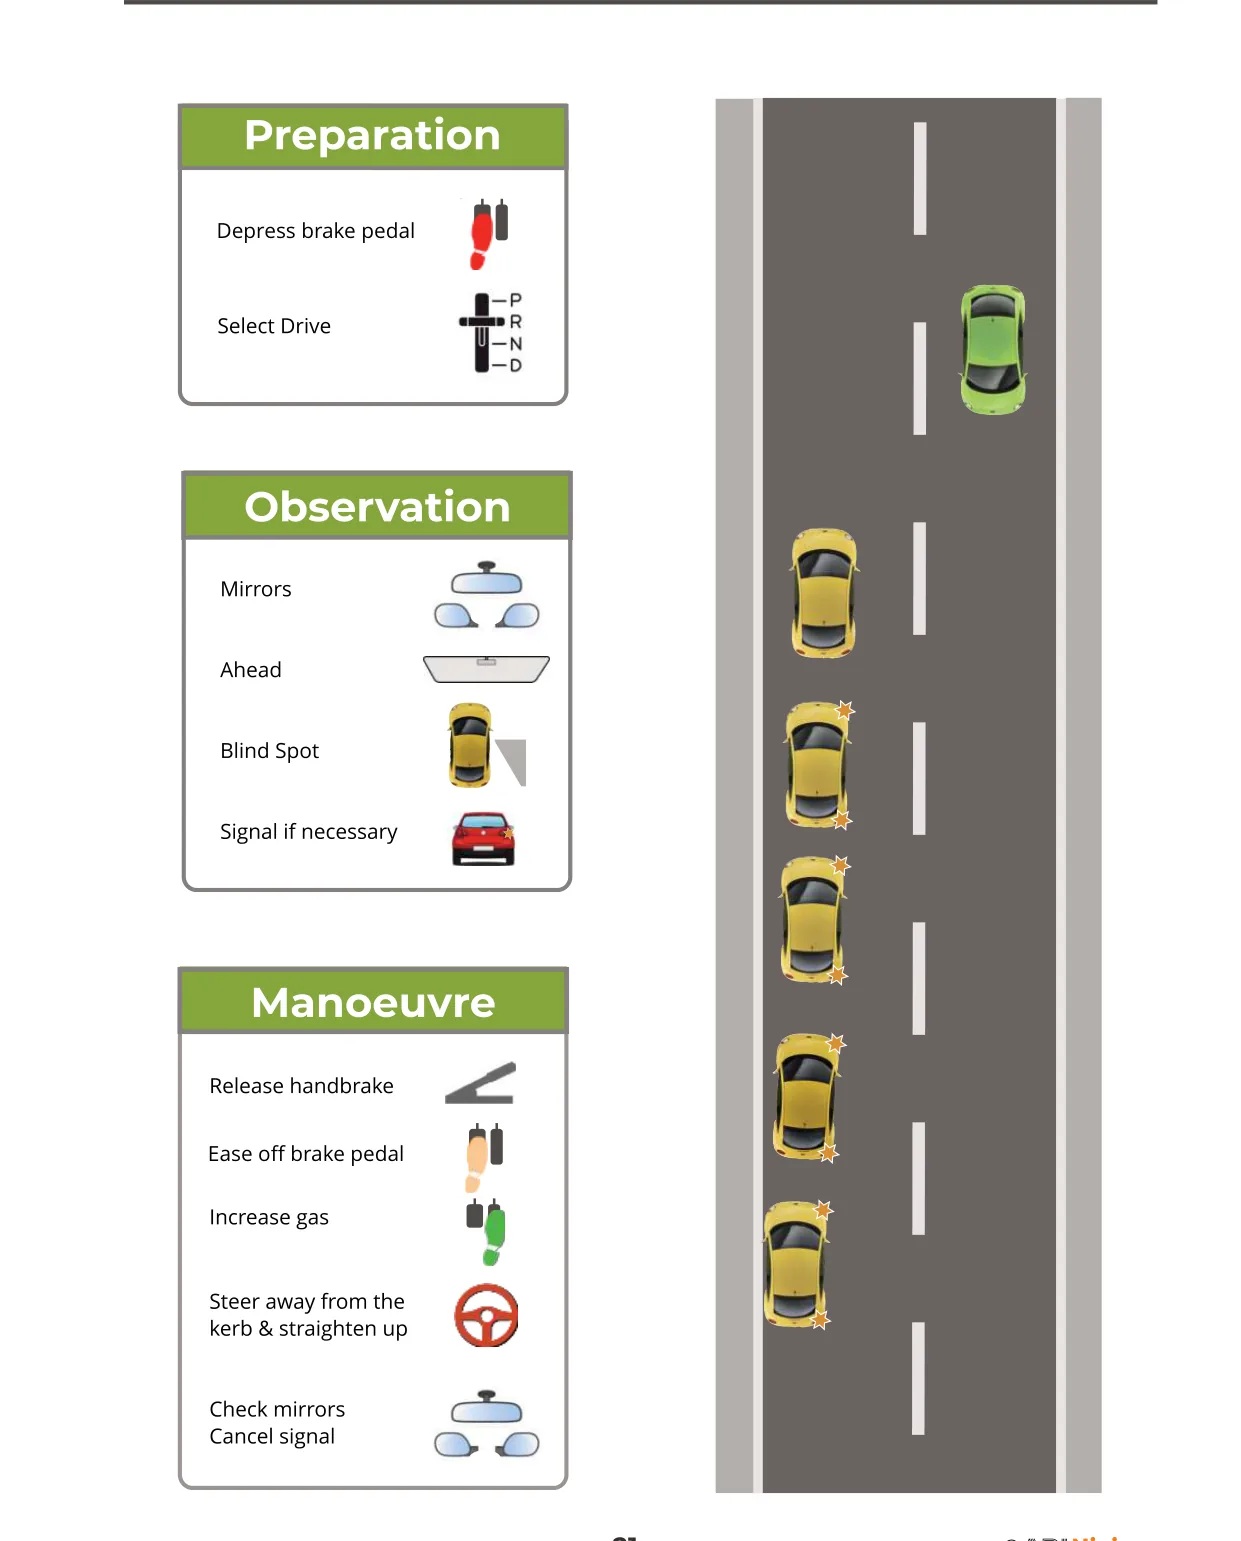
Moving off: prepare, observe all round (including the blind spot), then move.
Moving off: POM
Prepare: clutch down, select 1st gear (or Drive), set a little gas and bring the clutch to the biting point so the car is ready to pull.
Observe: check mirrors and the right blind spot. Signal only if it would help another road user.
Manoeuvre: release the parking brake, ease the clutch/gas to move off, steer a smooth line into your normal driving position, then cancel any signal and re-check your mirrors.
Stopping: MSPSL
Mirrors then signal if needed; position close to and parallel with the kerb; brake progressively (clutch down at the last moment in a manual).
After stopping: parking brake on, neutral selected (manual), cancel the signal, feet off the pedals.
Pick a safe, convenient and legal place, clear of junctions, driveways and hazard markings.
Reflect
At what stage do you release the parking brake, and why then?
What could happen if you don't check the blind spot?
When is a signal actually useful when moving off, and when is it pointless?
🚗 On the road: Repeat move-off / pull-up cycles on a quiet road until both feel smooth and the all-round check is automatic.
2
Core driving skills
The skills you'll use on every road, every drive, for the rest of your driving life.
✓
LESSON 4
Mirrors & blind spots
▼
Objective: Set and use all three mirrors effectively, understand what they show, and know where your blind spots are and how to deal with them.
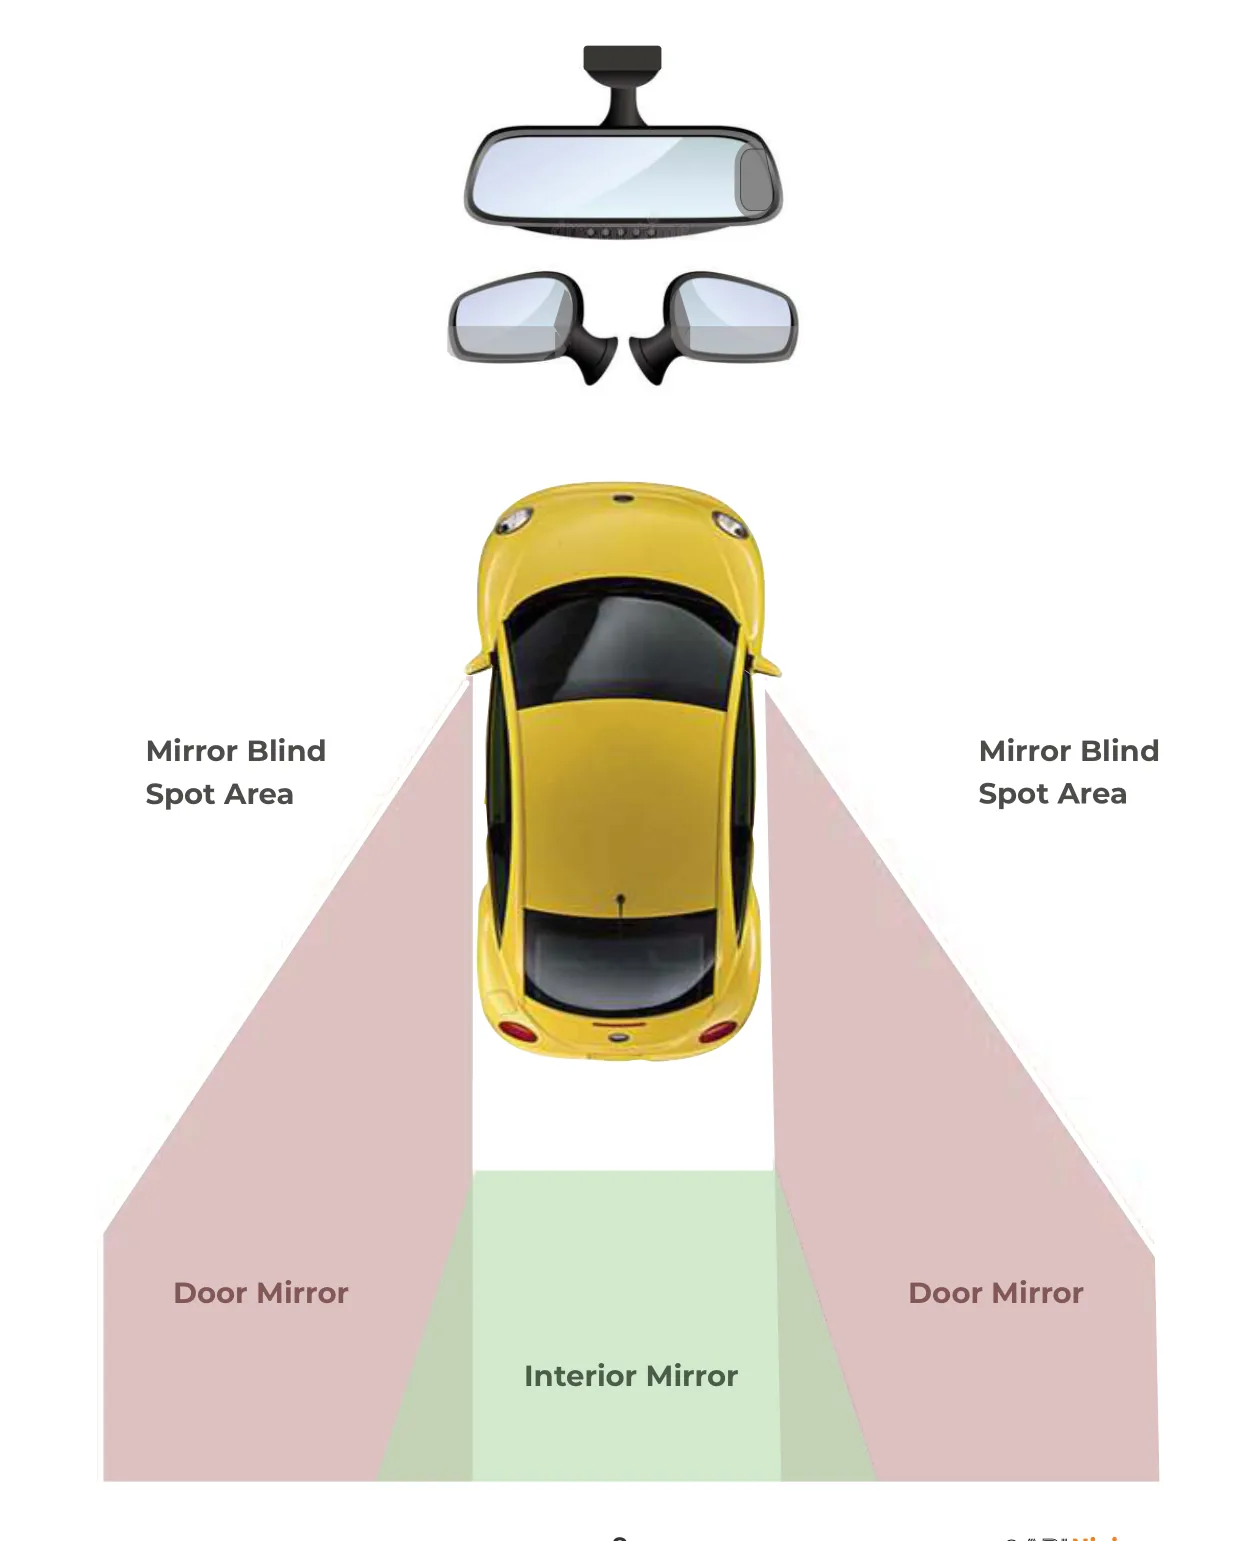
What each mirror shows, and where the blind spots are.
Key teaching points
The interior mirror shows the true size and distance of vehicles behind. Door mirrors are slightly convex, so things look smaller and further away than they really are.
Look and act. Checking a mirror is pointless unless you take in what's there and let it change your plan.
Use mirrors before changing speed, changing direction, turning, changing lane or overtaking. That's why Mirrors comes first in MSPSL.
Blind spots sit just behind each shoulder where no mirror reaches. A quick head-check ("a glance, not a stare") catches the cyclist or car hiding there.
At night, use the anti-dazzle setting on the interior mirror to cut headlight glare from behind.
Reflect
Why does the right door mirror matter most before turning or moving right?
What's the value of a mirror check after you've turned a corner?
Give an example where what you see behind changes your plan ahead.
🚗 On the road: Build a "mirror habit": a quick interior-mirror glance roughly every 5–8 seconds and always before you act.
✓
LESSON 5
Signals & the MSPSL routine
▼
Objective: Give clear, well-timed signals, read the signals of others, and apply the full MSPSL routine to any hazard.
Giving signals within the MSPSL routine.
Key teaching points
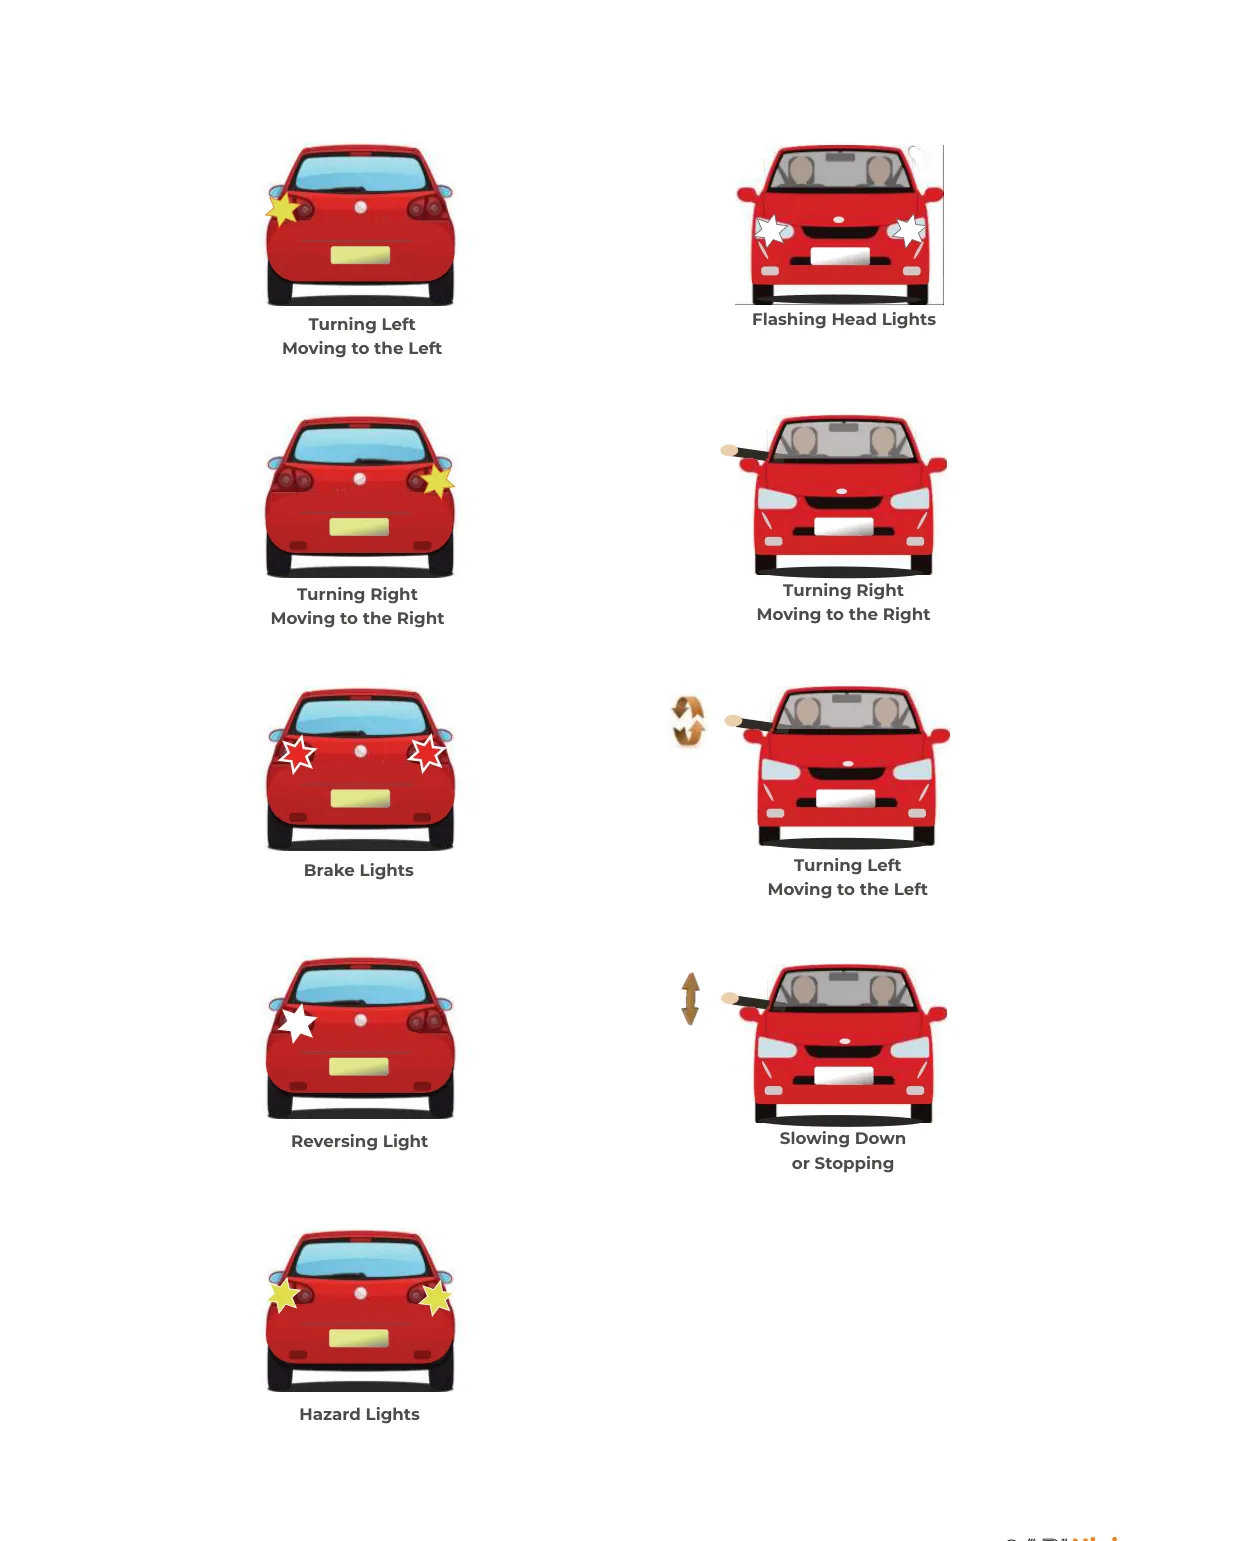
Ways we signal: indicators, brake lights, hazard lights, reversing lights, occasionally the horn or headlight flash (to say "I'm here", never "go ahead"), and arm signals.
Timing is everything. Too early and a side road makes it misleading; too late and others can't react. Always cancel it afterwards.
Position is a signal too. Where you sit in the road tells other drivers what you intend before your indicator does.
Read others: a signalling car may not actually turn, so wait for it to act. Respond early and calmly to emergency vehicles, but never break the law (e.g. jump a red light) to let one past.
MSPSL ties it together: Mirrors → Signal → Position → Speed → Look. It's the backbone of Stages 3–5.
Reflect
Give an example of a misleading signal and the trouble it could cause.
Why shouldn't you wave a pedestrian across the road?
Why must Mirrors come before Signal in the routine?
🚗 On the road: Narrate the MSPSL steps aloud as you approach each hazard until the sequence is automatic.
✓
LESSON 6
Steering, gears & clutch control
▼
Objective: Steer smoothly and accurately, change gear at the right time without looking down, and master clutch control for slow, precise movement.
Clutch control and finding the biting point.
Key teaching points
Steering: a relaxed "pull-push" or feed the wheel. Keep both hands on the rim and look well ahead where you want to go. Avoid palming the wheel. What the tester actually marks is both hands off at the same time, prolonged one-handed steering, and steering too much or too little, so pull-push is a habit that keeps you out of all three rather than a rule in itself.
Gears match speed and demand: lower gears for pulling power and slow control, higher gears for cruising. Change up as speed builds, down for more control or power.
The biting point is where the clutch starts to transfer power. Finding it smoothly is the secret to stalling-free moving off and creeping.
Avoid coasting (rolling with the clutch down or in neutral): you lose engine braking and control.
Automatics: P-R-N-D plus possibly S (sport) or L/manual. Drive does the changes for you; just control speed with the right foot.
Reflect
How do you decide which gear you need for a given situation?
Why is coasting a problem on the approach to a hazard?
What tells you you've found the biting point without looking down?
🚗 On the road: Practise clutch-control "creeping" in a quiet space. Moving at walking pace on the clutch alone builds the feel you'll need for junctions and manoeuvres.
3
Junctions
Where most learning happens: emerging, turning and crossroads, all built on MSPSL.
✓
LESSON 7
Emerging from junctions (left & right)
▼
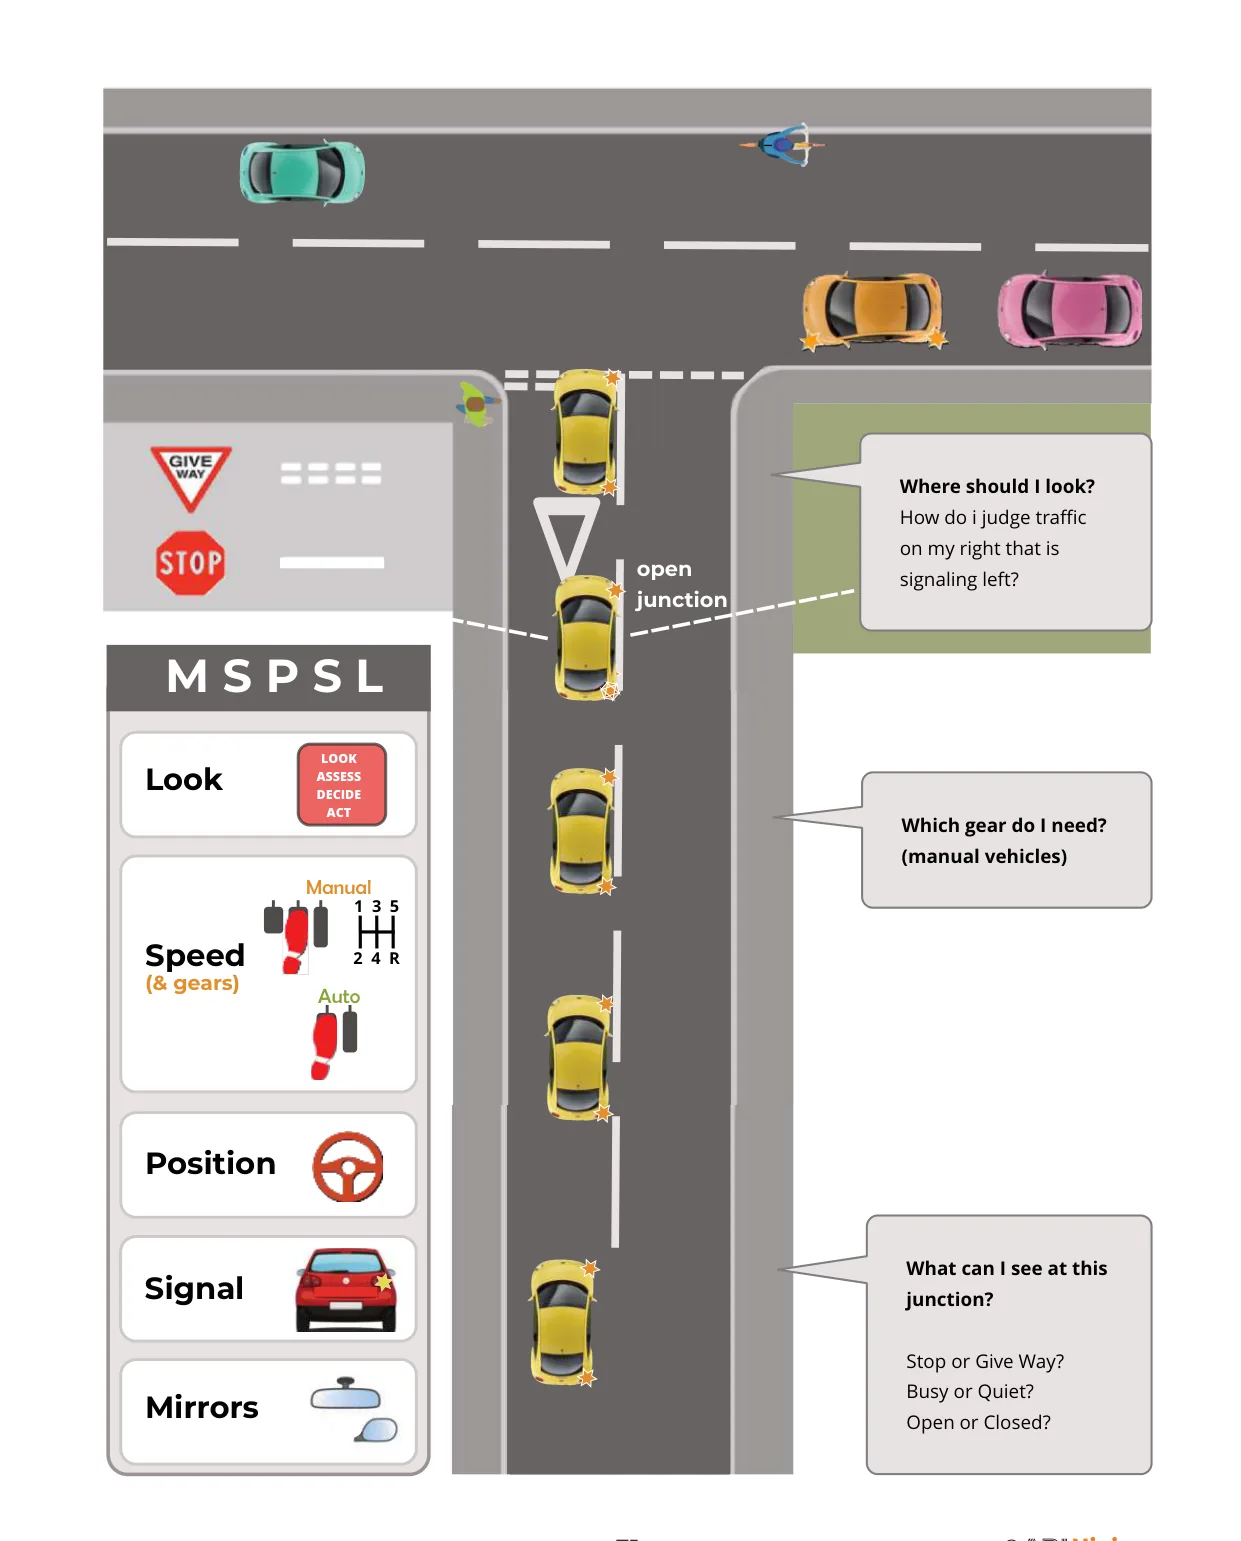
Objective: Approach a T-junction reading whether it's open or closed, busy or quiet, and emerge safely left or right using MSPSL.
Emerging at a T-junction using MSPSL.
Key teaching points
Open vs closed: an open junction gives an early view so you can keep moving if clear; a closed junction (walls, hedges, parked cars) hides the road, so slow right down and peep and creep.
Give way vs stop: broken lines = give way (proceed if clear); solid line with "STOP" = you must stop completely every time.
Apply MSPSL on approach: mirrors, signal in good time, position (follow the kerb line; keep left for emerging right unless marked otherwise), reduce speed and select the gear that lets you go or wait.
Look both ways. Even turning left, check right for oncoming traffic and check left for cyclists and pedestrians.
Vulnerable road users first: give priority to pedestrians already crossing and watch for cyclists down your left side.
Reflect
What's the difference between a "stop" and a "give way" junction?
Why look left as well as right before emerging right?
What might you see in your left door mirror that changes your decision?
🚗 On the road: Start on quiet, open junctions to groove the routine, then progress to busier, closed ones where timing and judgement matter more.
✓
LESSON 8
Turning into side roads (left & right)
▼
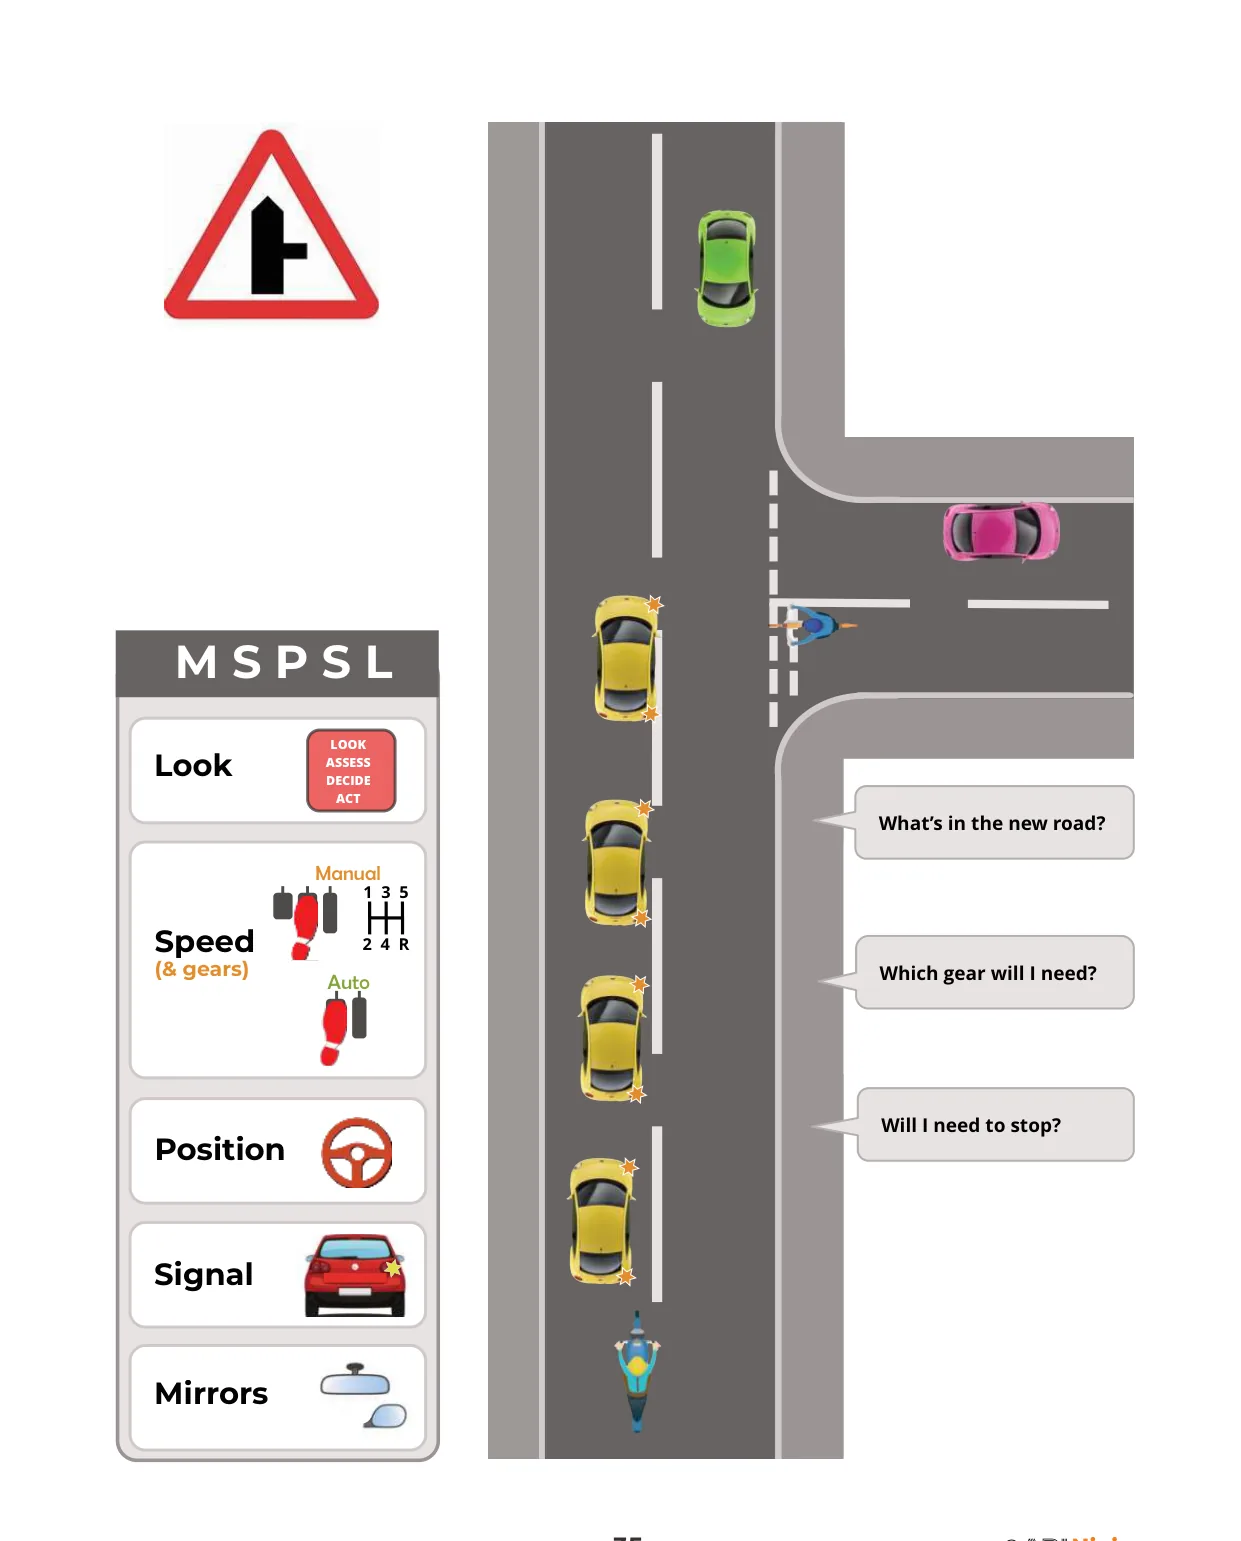
Objective: Turn from a major road into a minor road under full control, judging oncoming traffic for right turns and protecting pedestrians and cyclists.
Turning right: position to the centre line, turn at the point of turn.
Key teaching points
Turning left: keep well to the left, don't swing wide or cut the kerb, and watch for cyclists down your nearside and pedestrians crossing the side road.
Turning right: position just left of the centre line, signal in good time, and use LADA (Look, Assess, Decide, Act) on oncoming traffic.
Point of turn: turn the wheel when your car reaches the point where the new road opens up. Turning too early cuts the corner into oncoming traffic.
Don't hold back too far when waiting to turn right. Creep to the centre so following traffic can pass on your left if the road allows.
Pedestrians crossing the road you're entering have priority. Wait for them.
Reflect
Which door mirror matters most before a right turn, and why?
What problems come from signalling too early or too late?
How do you judge it's safe to turn across oncoming traffic?
🚗 On the road: Treat every turn as MSPSL. Most early faults are rushing speed on approach or cutting the right-turn corner.
✓
LESSON 9
Crossroads
▼
Objective: Deal with crossroads safely: knowing who has priority, handling unmarked crossroads, and turning right with oncoming traffic also turning right.
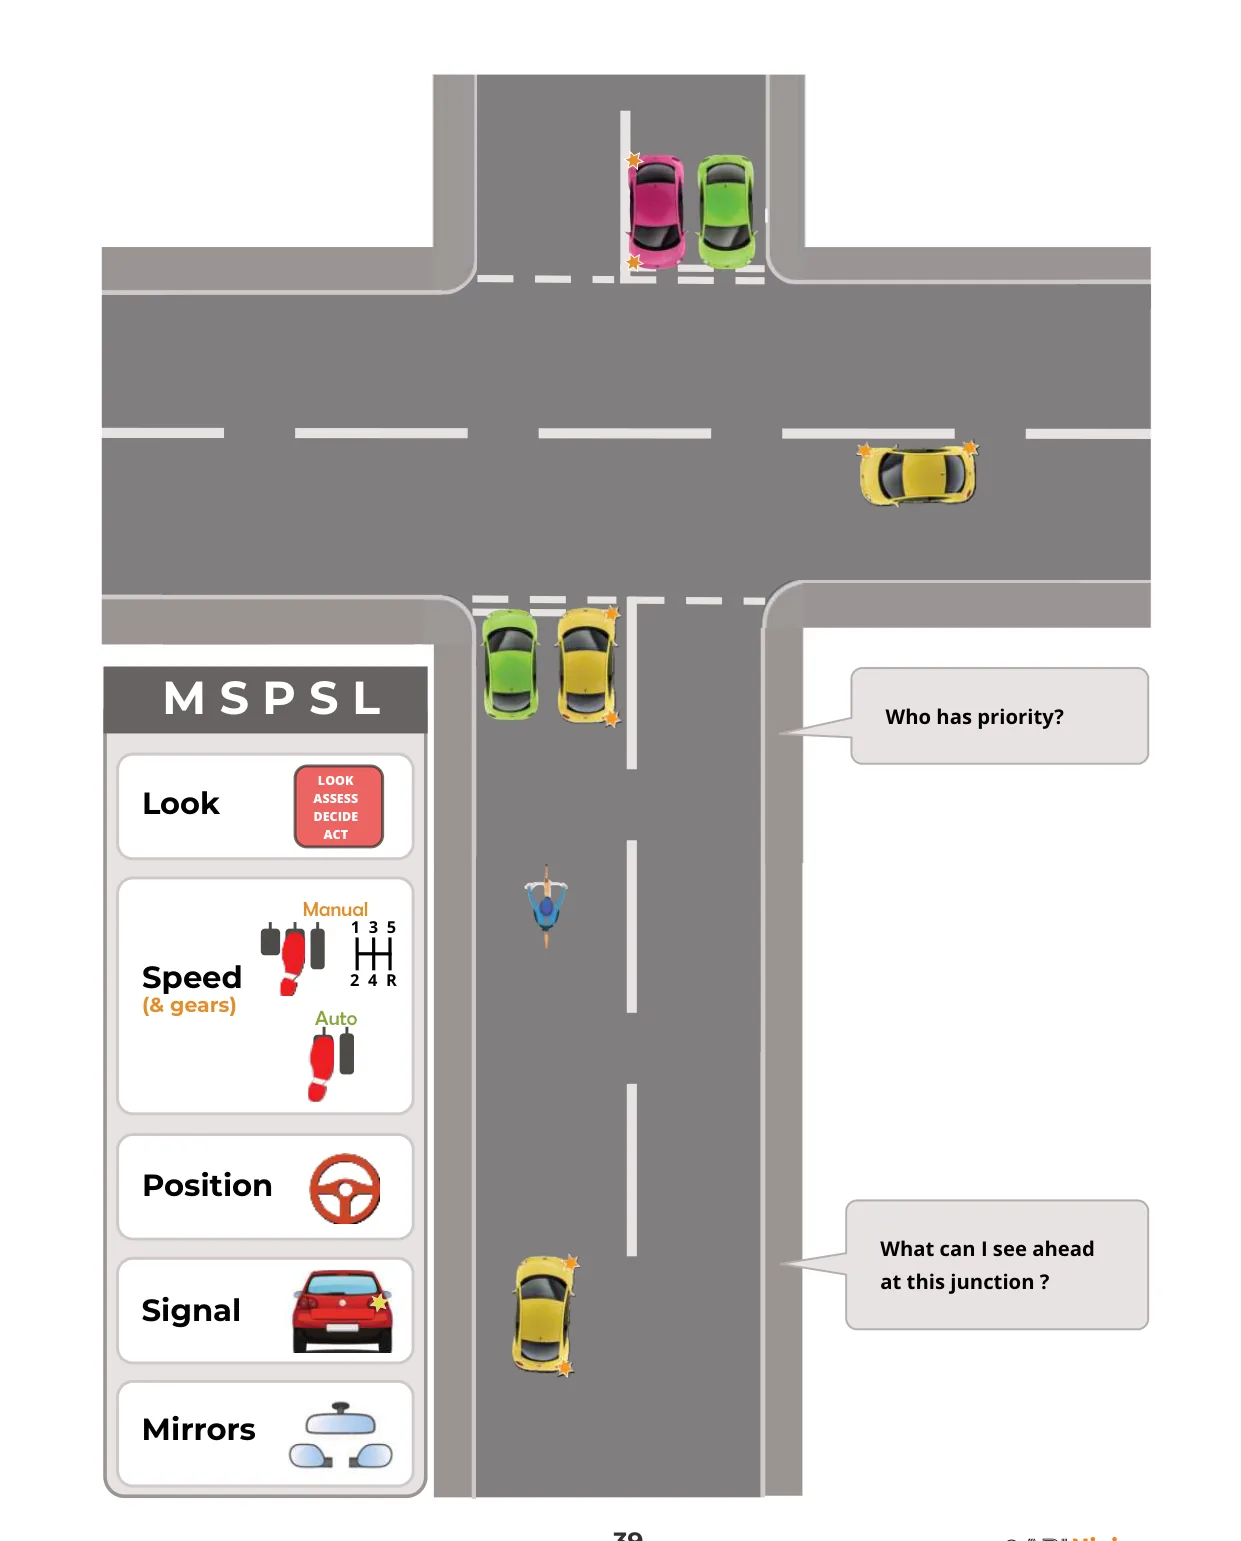
Crossroads and who has priority.
Key teaching points
On the major road, you have priority over the side roads, but stay alert for vehicles emerging without looking.
On the minor road, apply the emerging routine and give way; treat the crossroads as two junctions to watch at once.
Unmarked crossroads give no one priority, so slow down, make eye contact, and proceed only when you're certain it's safe.
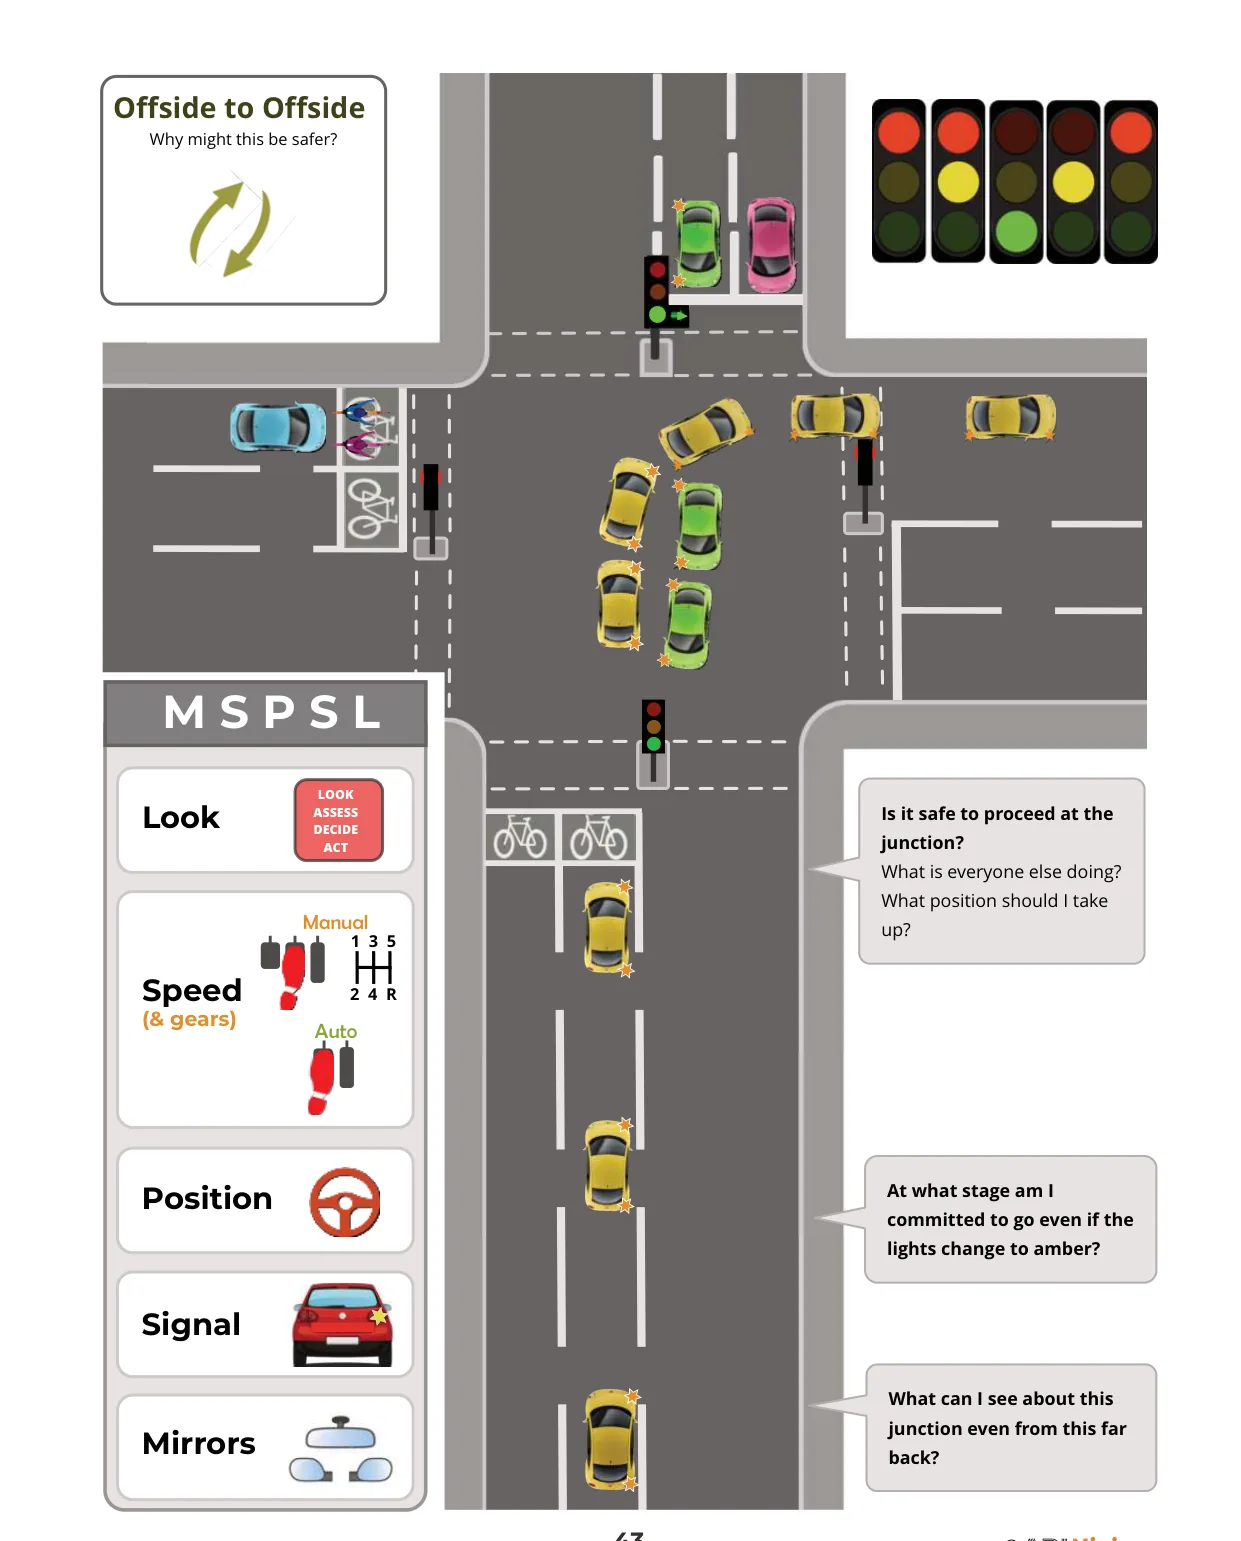
Turning right when oncoming traffic also turns right: normally pass "offside to offside" (driver's side to driver's side) so you can both see past each other. Follow road markings where they say otherwise.
Watch for pedestrians and cyclists crossing your path on every arm of the junction.
Reflect
Who has priority at an unmarked crossroads?
Why can passing "offside to offside" be safer when turning right?
What extra hazards does a crossroads add over a simple T-junction?
🚗 On the road: Practise both straight-across and right-turn crossroads; the right-turn-across-right-turn situation needs the most rehearsal.
4
Traffic systems
Lights and roundabouts: busier junctions where lane discipline and observation are everything.
✓
LESSON 10
Traffic lights
▼
Objective: Approach and pass through traffic lights safely, in the correct lane, ready to stop or go, and deal with filter arrows and yellow box junctions.
Traffic lights: lane choice, sequence and positioning.
Key teaching points
Anticipate the change. A light that's been green a long time ("stale green") may change, so be ready to stop. Cover the brake on approach.
Green means go only if the exit is clear. Never enter a junction you can't clear, and keep yellow box junctions free unless turning right and only oncoming traffic stops you.
Amber means stop unless you're so close that stopping would be dangerous.
Lane discipline: get into the correct lane early for your direction; obey filter arrows. A green filter lets you go that way even if the main light is red.
When lights fail, treat the junction as an unmarked crossroads and proceed with great care.
Reflect
What does a green light actually permit you to do?
When may you cross the stop line on amber?
Why keep a yellow box junction clear, and what's the one exception?
🚗 On the road: Practise reading lights early and choosing lanes in good time. Late lane changes are a common test fault.
✓
LESSON 11
Roundabouts
▼
Objective: Approach, enter and leave roundabouts safely with the correct lane, signals and observation for left, ahead and right exits.
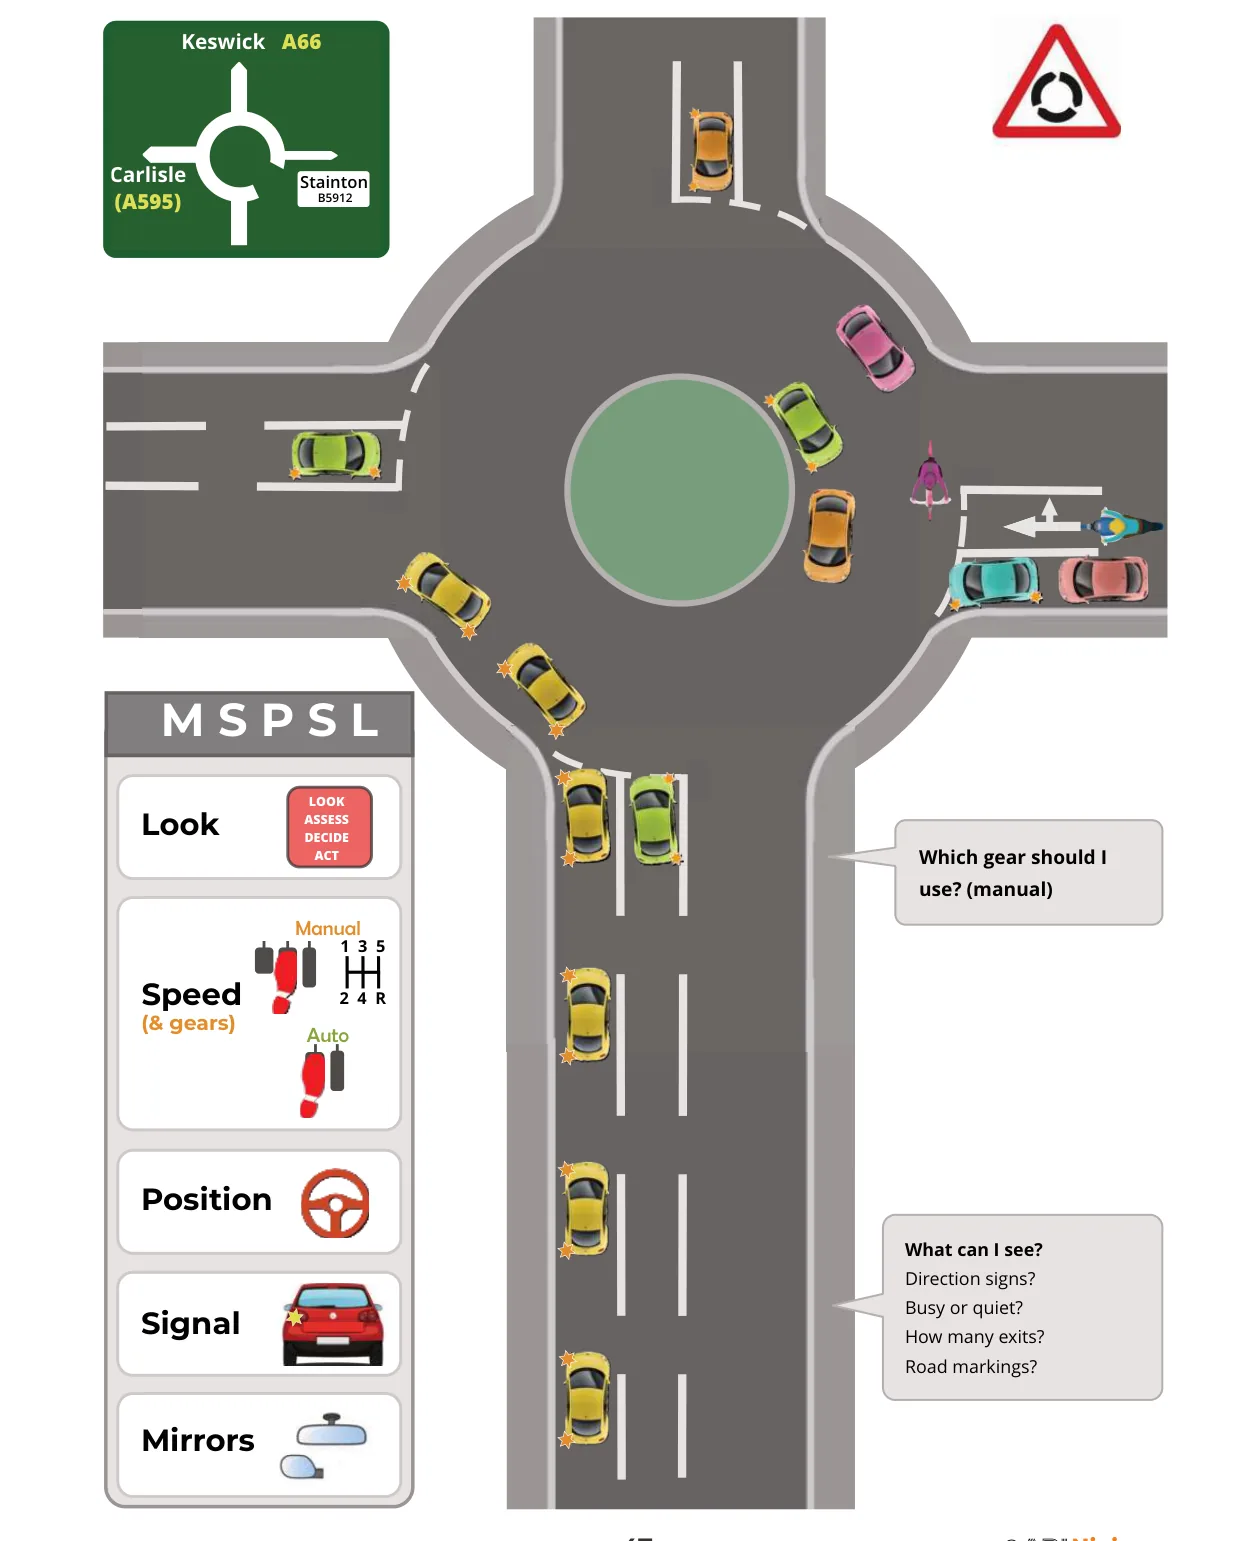
Roundabouts: the lane and signal for each exit.
Key teaching points
Assess on approach: read the signs and markings, how busy it is, and which exit you need before you arrive.
Give way to traffic from your right, but keep moving if there's a safe gap; stopping when you don't need to causes problems behind.
Left exit: signal left, approach in the left lane, stay left. Ahead: usually no entry signal, left lane (unless marked), signal left after the exit before yours.
Right / full turn: signal right, approach in the right lane, keep to the right going round, then signal left after the exit before the one you want.
Watch the vulnerable: cyclists and horse riders often stay in the left lane even when turning right; long vehicles may straddle lanes, so give them room.
Reflect
Why can it be dangerous to stop at a roundabout when you don't have to?
What clues tell you which exit another vehicle will take?
Why might a cyclist hold the left lane while going right round?
🚗 On the road: Master one quiet roundabout for lane and signal timing before tackling multi-lane or spiral roundabouts.
✓
LESSON 12
Mini, multiple & spiral roundabouts
▼
Objective: Handle the trickier roundabout types (mini, double/multiple and spiral) with the right observation and priorities.
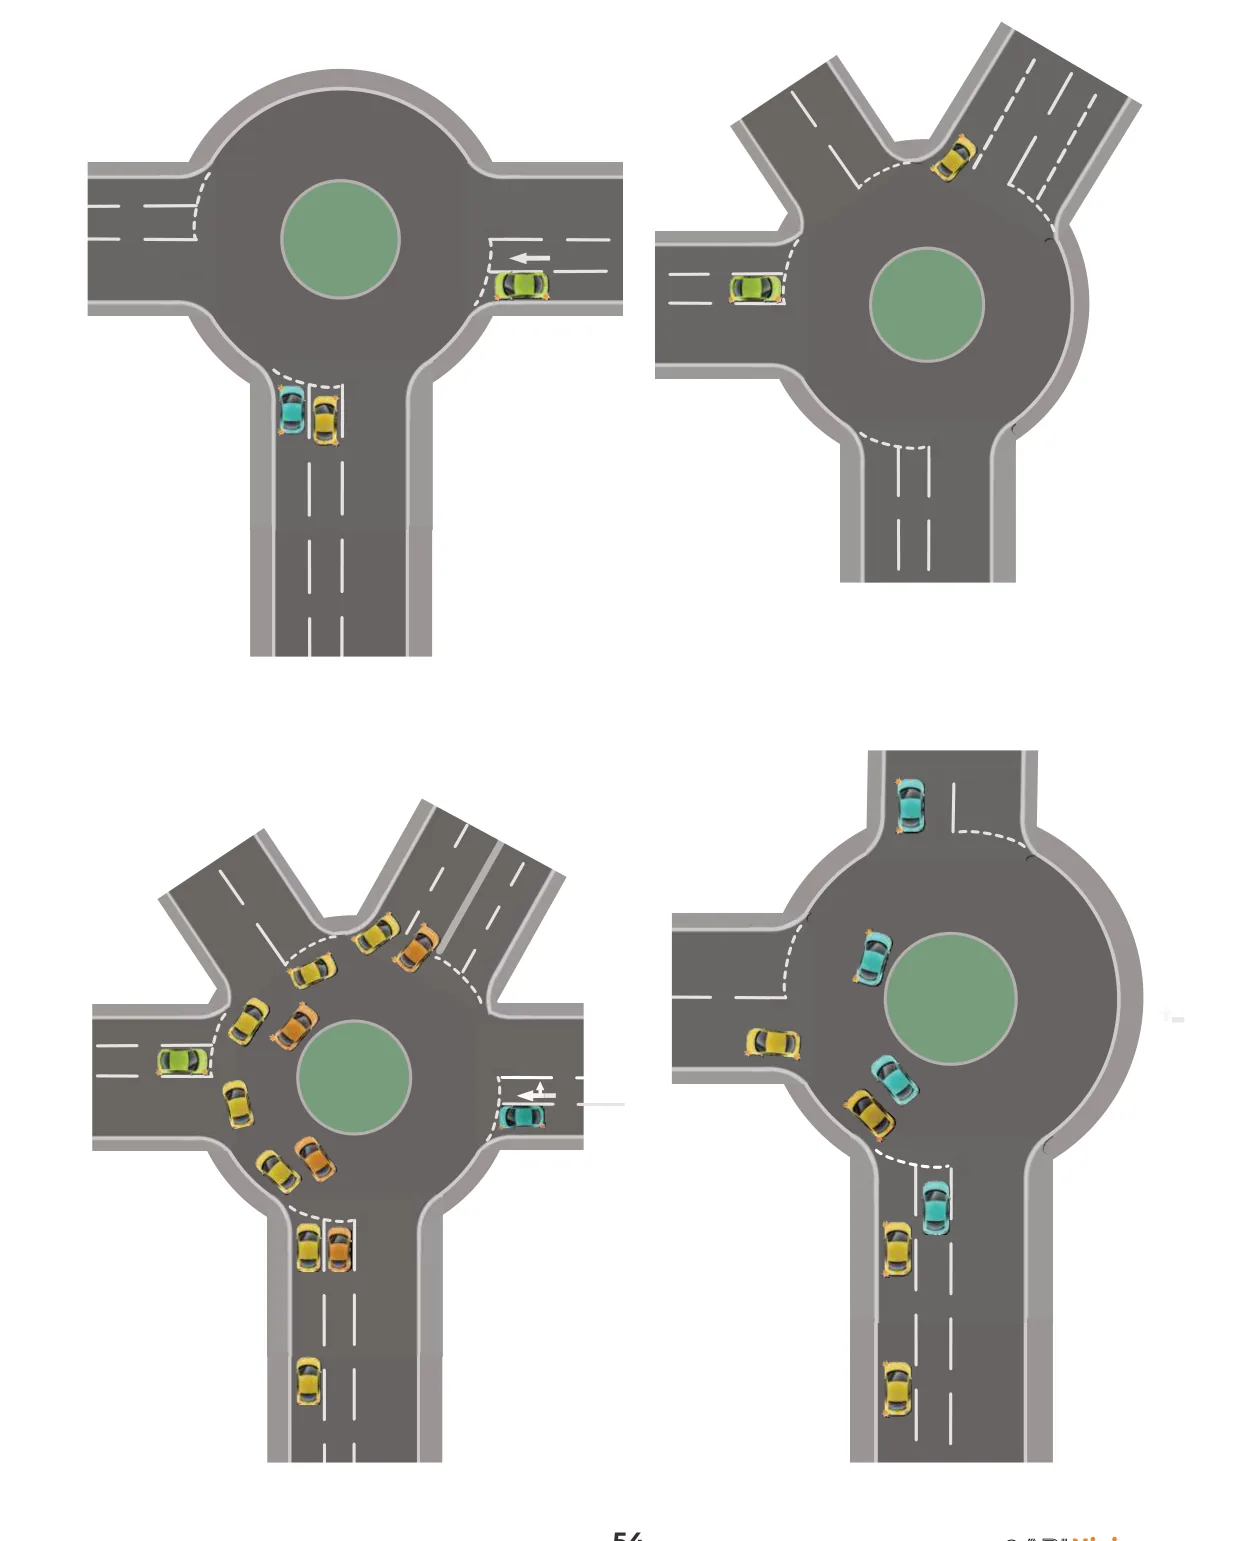
Mini and multiple roundabouts.
Key teaching points
Mini roundabouts still mean priority to the right and a full pass around the central marking. There's just less room and less time, so observe and decide early.
You may drive over the central white circle only if your vehicle is too large to go around it; cars should go around.
Signalling can sometimes be omitted at a mini roundabout if events happen too quickly to be useful, but signal whenever it helps others.
Double/multiple mini roundabouts: treat each one separately, giving priority to the right at each in turn; they catch people out, so go slowly.
Spiral roundabouts guide you with painted lanes, so follow your lane markings round instead of cutting across, and avoid U-turns at minis.
Reflect
How do you identify a mini roundabout, and who has priority?
When might it be acceptable not to signal off a mini roundabout?
What makes large vehicles at minis a special hazard?
🚗 On the road: Slow your approach right down at minis. Most errors come from arriving too fast to read the priorities.
5
Open roads & higher speeds
Reading the road ahead, sharing it safely, and handling faster, more complex environments.
✓
LESSON 13
Positioning, speed & following distance
▼
Objective: Hold a safe, central road position, choose a speed for the conditions, and keep a safe gap using the two-second rule.
Normal position: roughly a metre from the kerb on the left, not hugging it, not wandering toward the centre line.
The two-second rule is the minimum dry-road gap: as the car ahead passes a marker, you should not reach it for at least two seconds. Double it in the wet, and leave far more in ice or fog. (See our two-second rule article.)
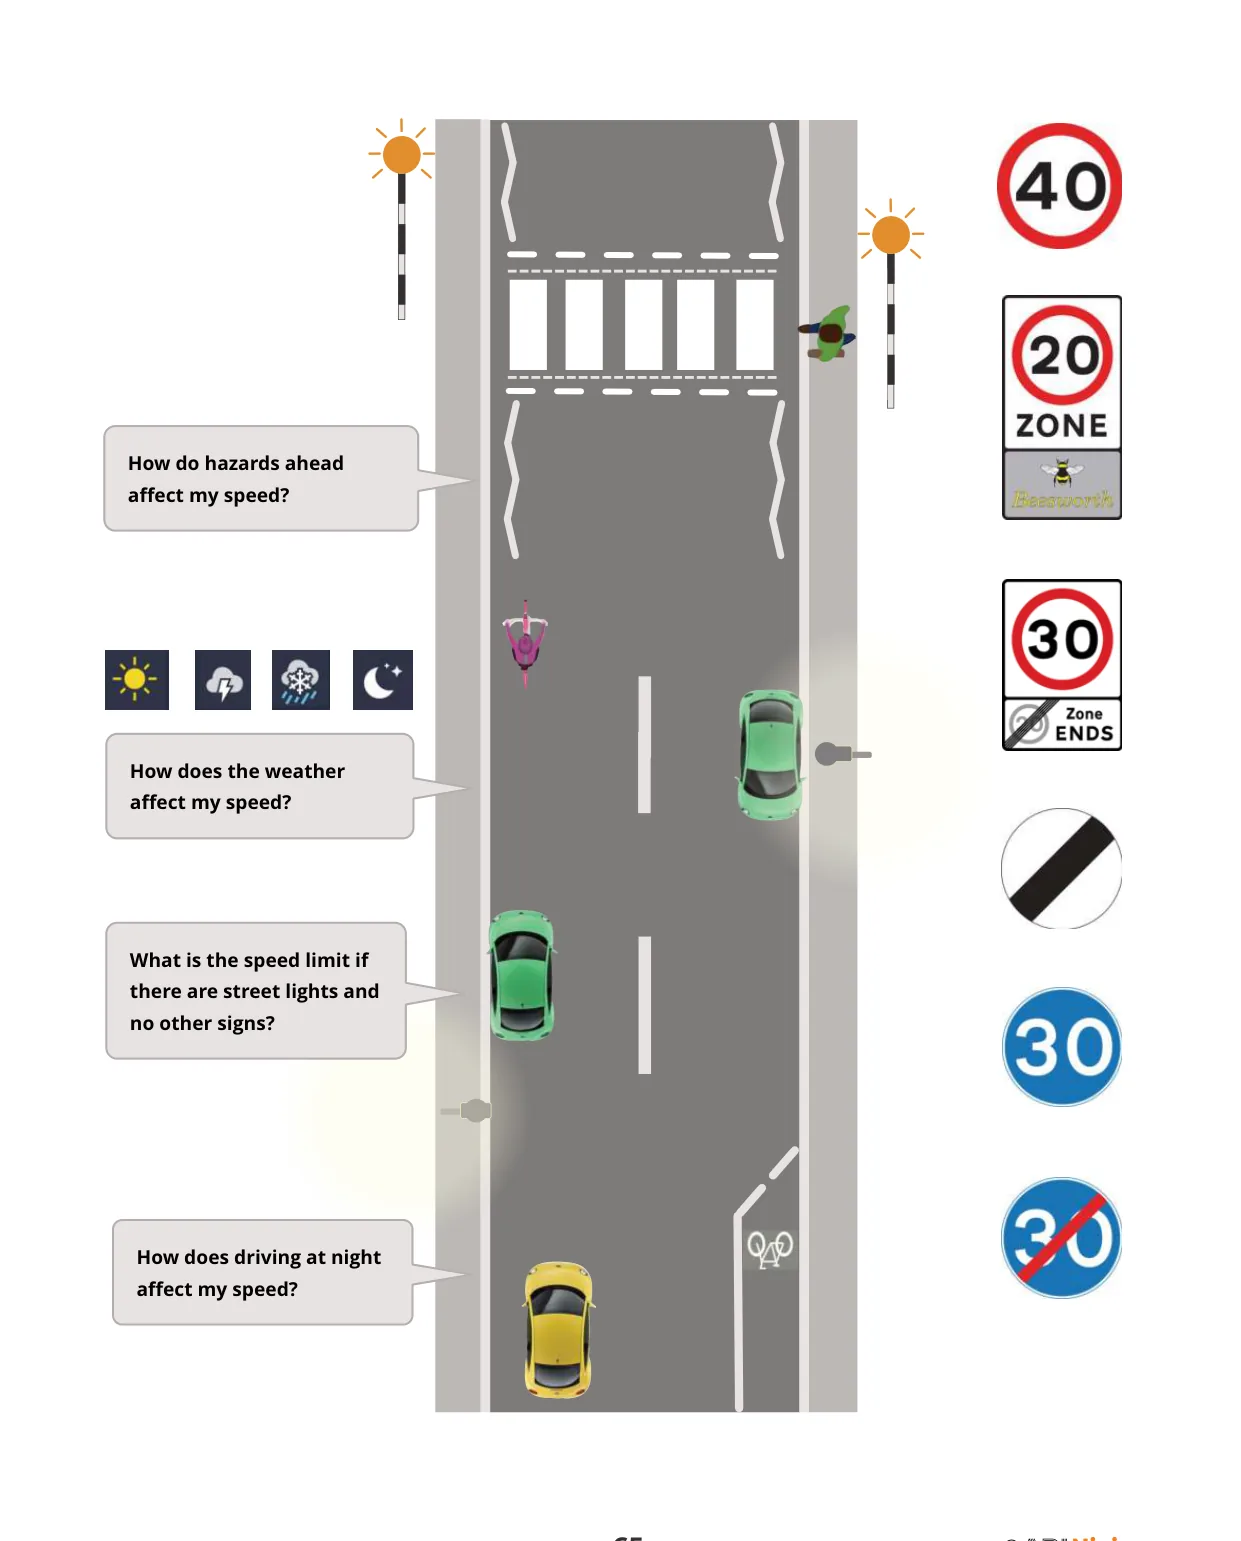
Speed for the conditions, not just the limit. The limit is a maximum, not a target. Adjust for bends, weather, light and how much you can see.
Look well ahead and plan early; the further you look, the smoother and safer your driving becomes.
Keep space around parked cars and give cyclists, horses and pedestrians plenty of clearance.
Reflect
Why is the speed limit a maximum rather than a target?
How does following distance change in rain, ice or fog?
What does poor positioning "tell" the drivers around you?
🚗 On the road: Count "only a fool breaks the two-second rule" to time your gap. It takes about two seconds to say.
✓
LESSON 14
Meeting traffic & overtaking
▼
Objective: Deal safely with oncoming traffic in narrow gaps, and judge when overtaking is safe, necessary and legal.
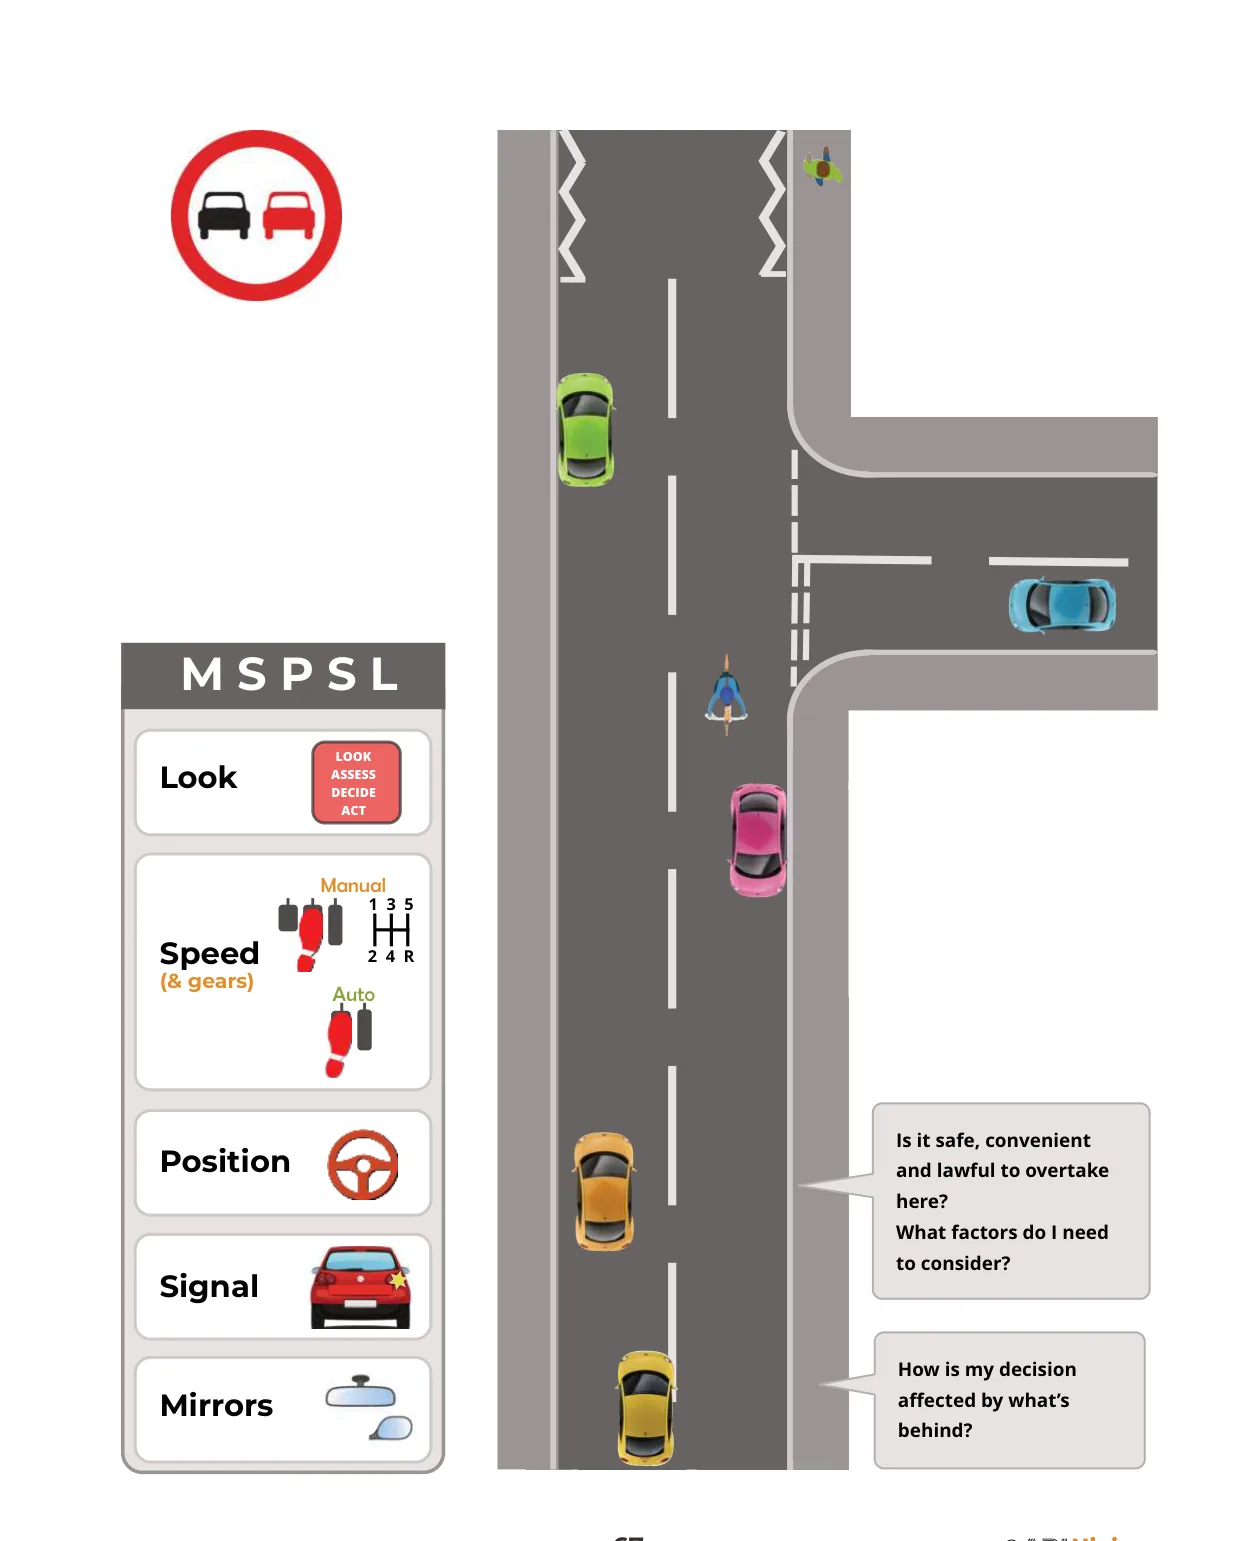
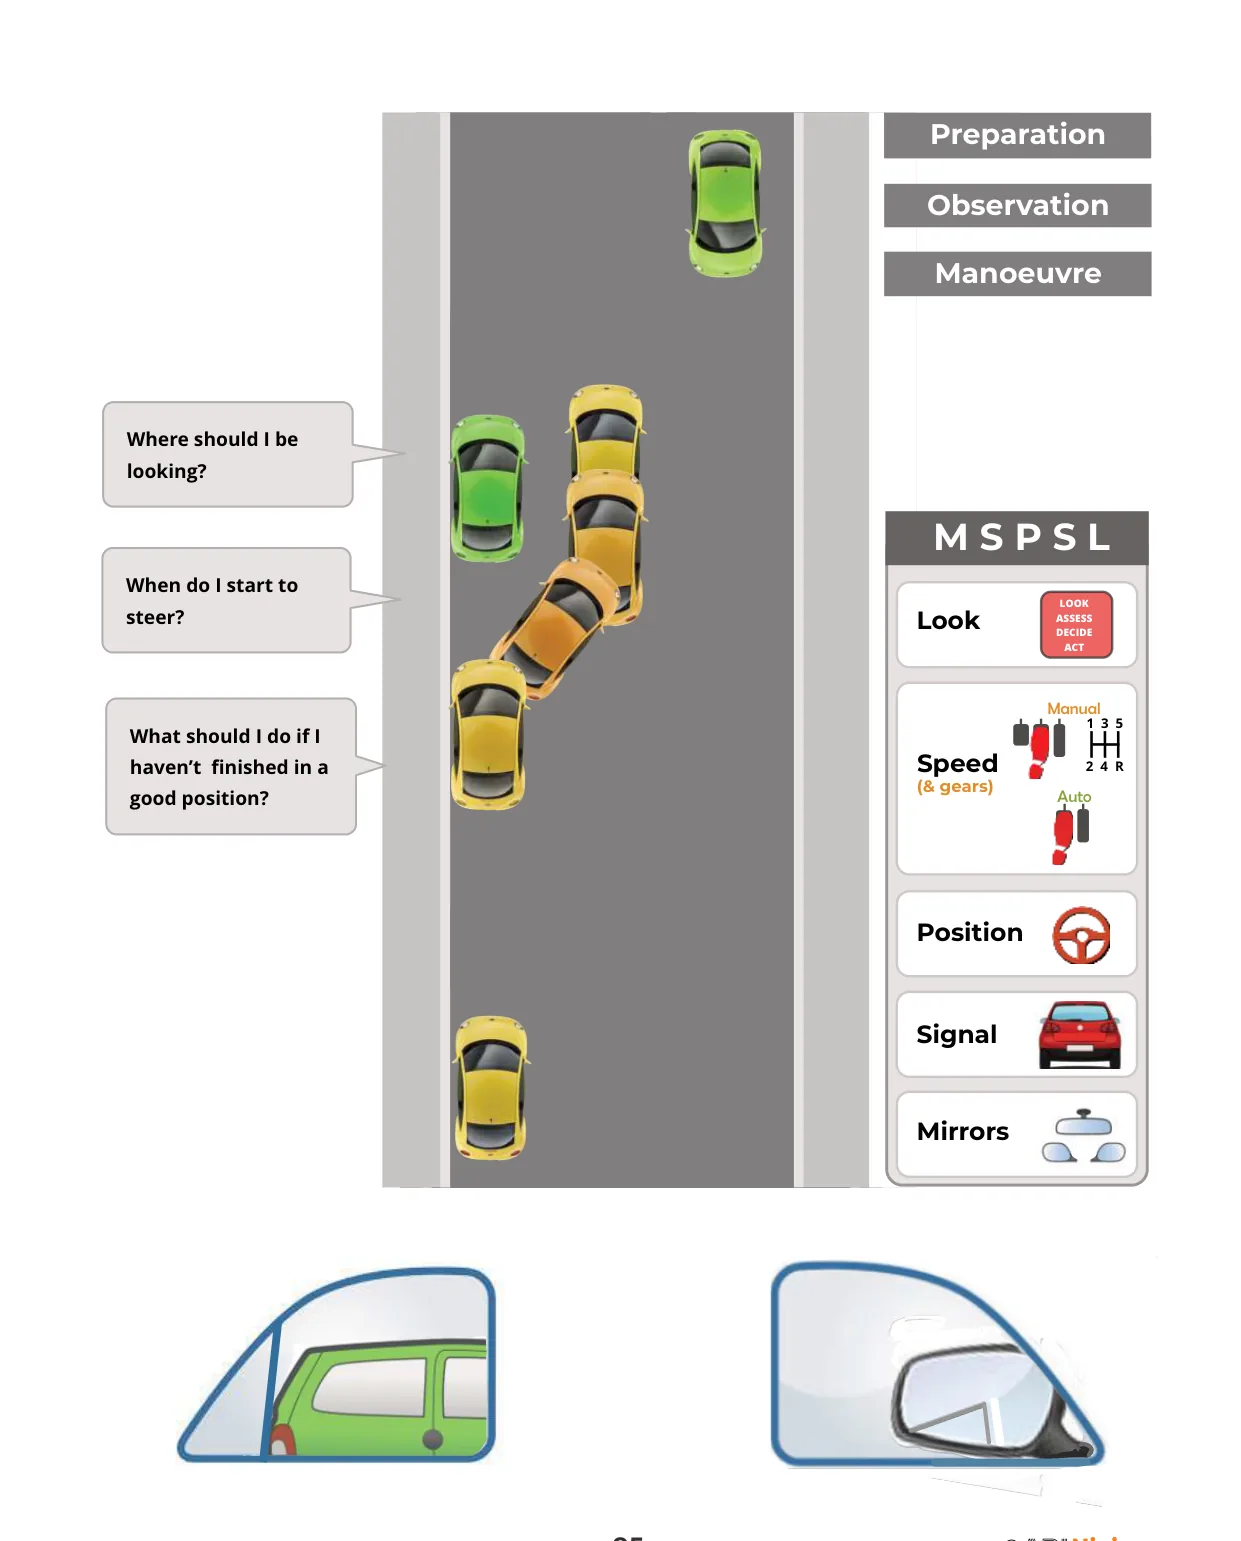
Judging a safe overtake.
Key teaching points
Meeting traffic: where parked cars or width force give-and-take, the driver with the obstruction on their side normally gives way, so slow early and be ready to hold back.
Ask first "do I even need to overtake?" Often patience costs only seconds and removes all the risk.
Never overtake near a bend, brow of a hill, junction, crossing or where your view is limited. You must be able to see the whole manoeuvre is clear.
Apply MSPSL, judge the oncoming closing speed, and get back to the left without cutting in.
Vulnerable road users: give cyclists and horse riders generous clearance (treat them like overtaking a car), and pass horses slowly and quietly.
Reflect
Why is overtaking near a junction so dangerous?
May you exceed the speed limit to complete an overtake?
How much room and what speed for passing a horse and rider?
🚗 On the road: Practise the decision, not just the act. Most of the skill is judging when not to overtake.
✓
LESSON 15
Pedestrian crossings
▼
Objective: Recognise and deal correctly with zebra and light-controlled (pelican/puffin/toucan) crossings.
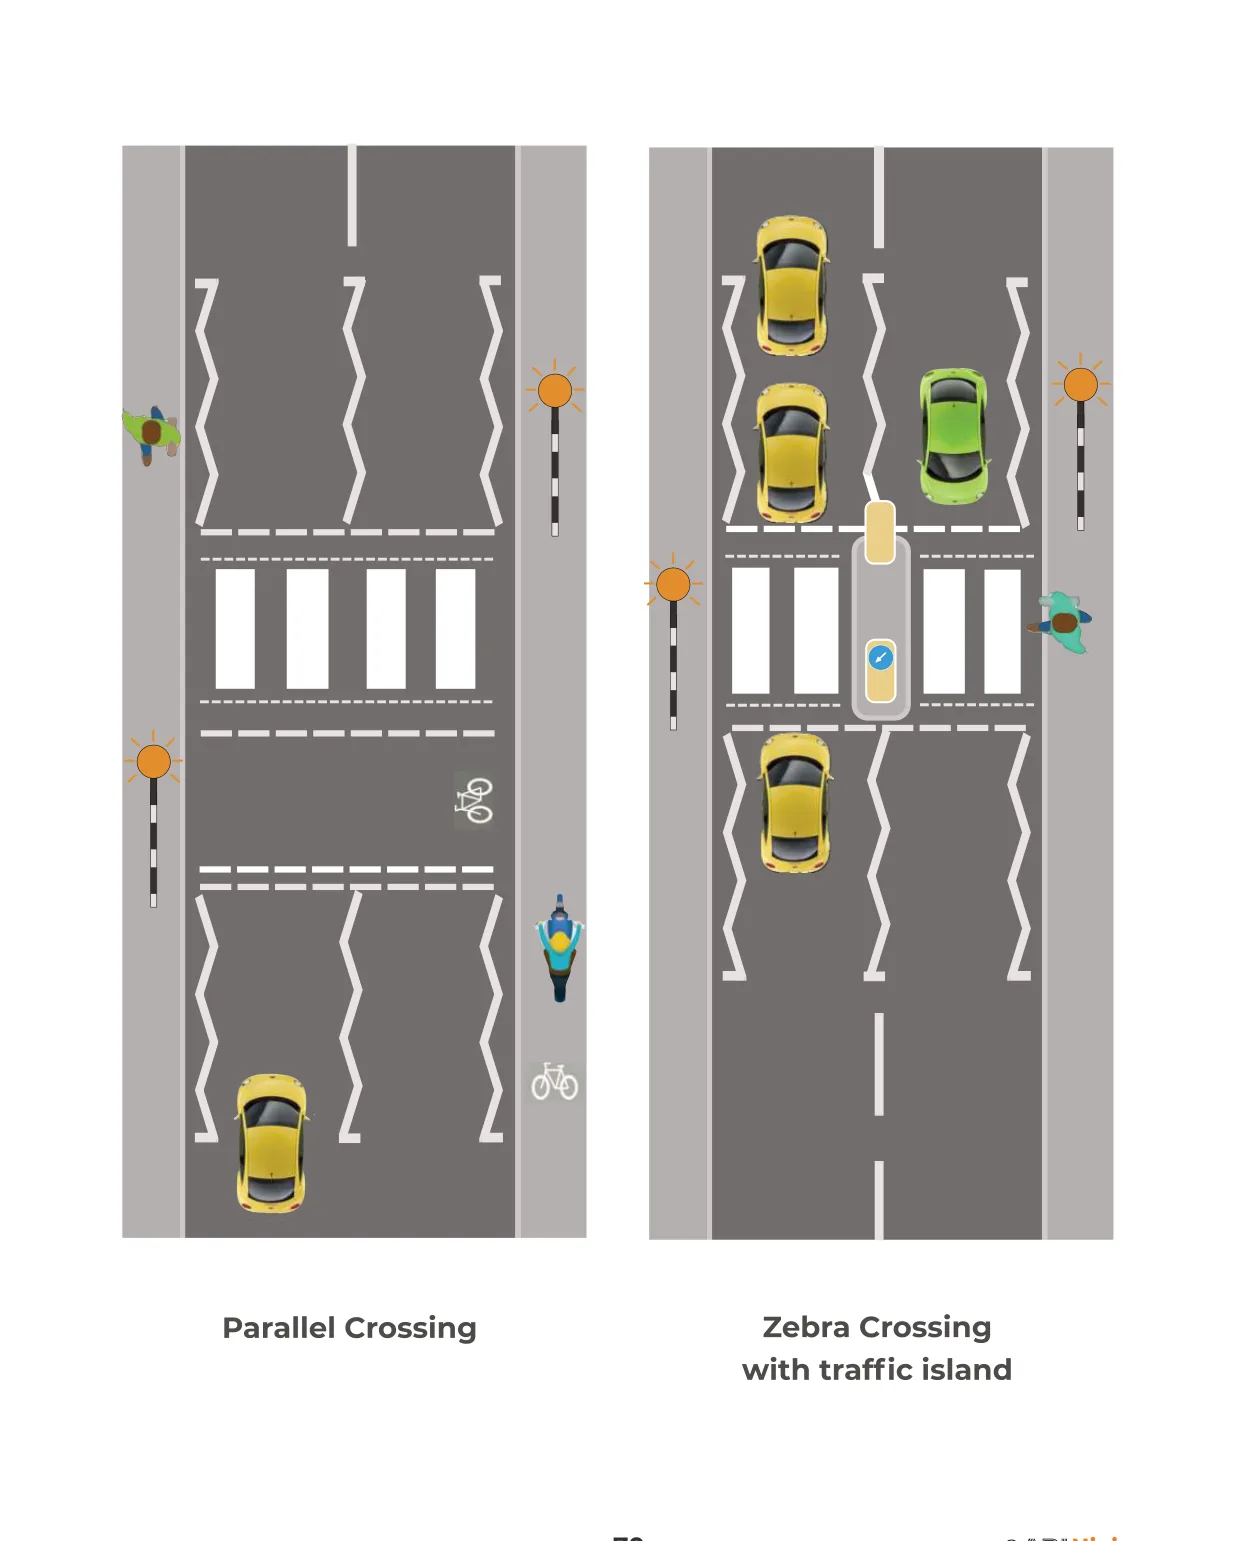
Dealing with pedestrian crossings.
Key teaching points
Zebra crossings: slow on approach, and you must stop for anyone waiting to cross or already crossing, but don't wave them across; let them decide.
Light-controlled crossings: obey the lights as you would at a junction. At a flashing amber (pelican), give way to pedestrians still on the crossing, then proceed when it's clear.
Toucan crossings are shared with cyclists; puffin crossings sense pedestrians and hold the lights until they're across.
Never overtake the vehicle nearest a crossing, and keep the crossing itself clear; don't stop on the zig-zag lines.
Watch for pedestrians stepping out late, especially children and older people.
Reflect
What must you do for someone waiting at a zebra crossing?
What does a flashing amber light at a pelican crossing mean?
Why is overtaking on the approach to a crossing so dangerous?
🚗 On the road: Slow early for every crossing so you can stop smoothly if someone steps up. Late, harsh stops are both unsafe and a fault.
✓
LESSON 16
Dual carriageways & motorways
▼
Objective: Join, drive on and leave dual carriageways and motorways safely, with good lane discipline and observation at speed.
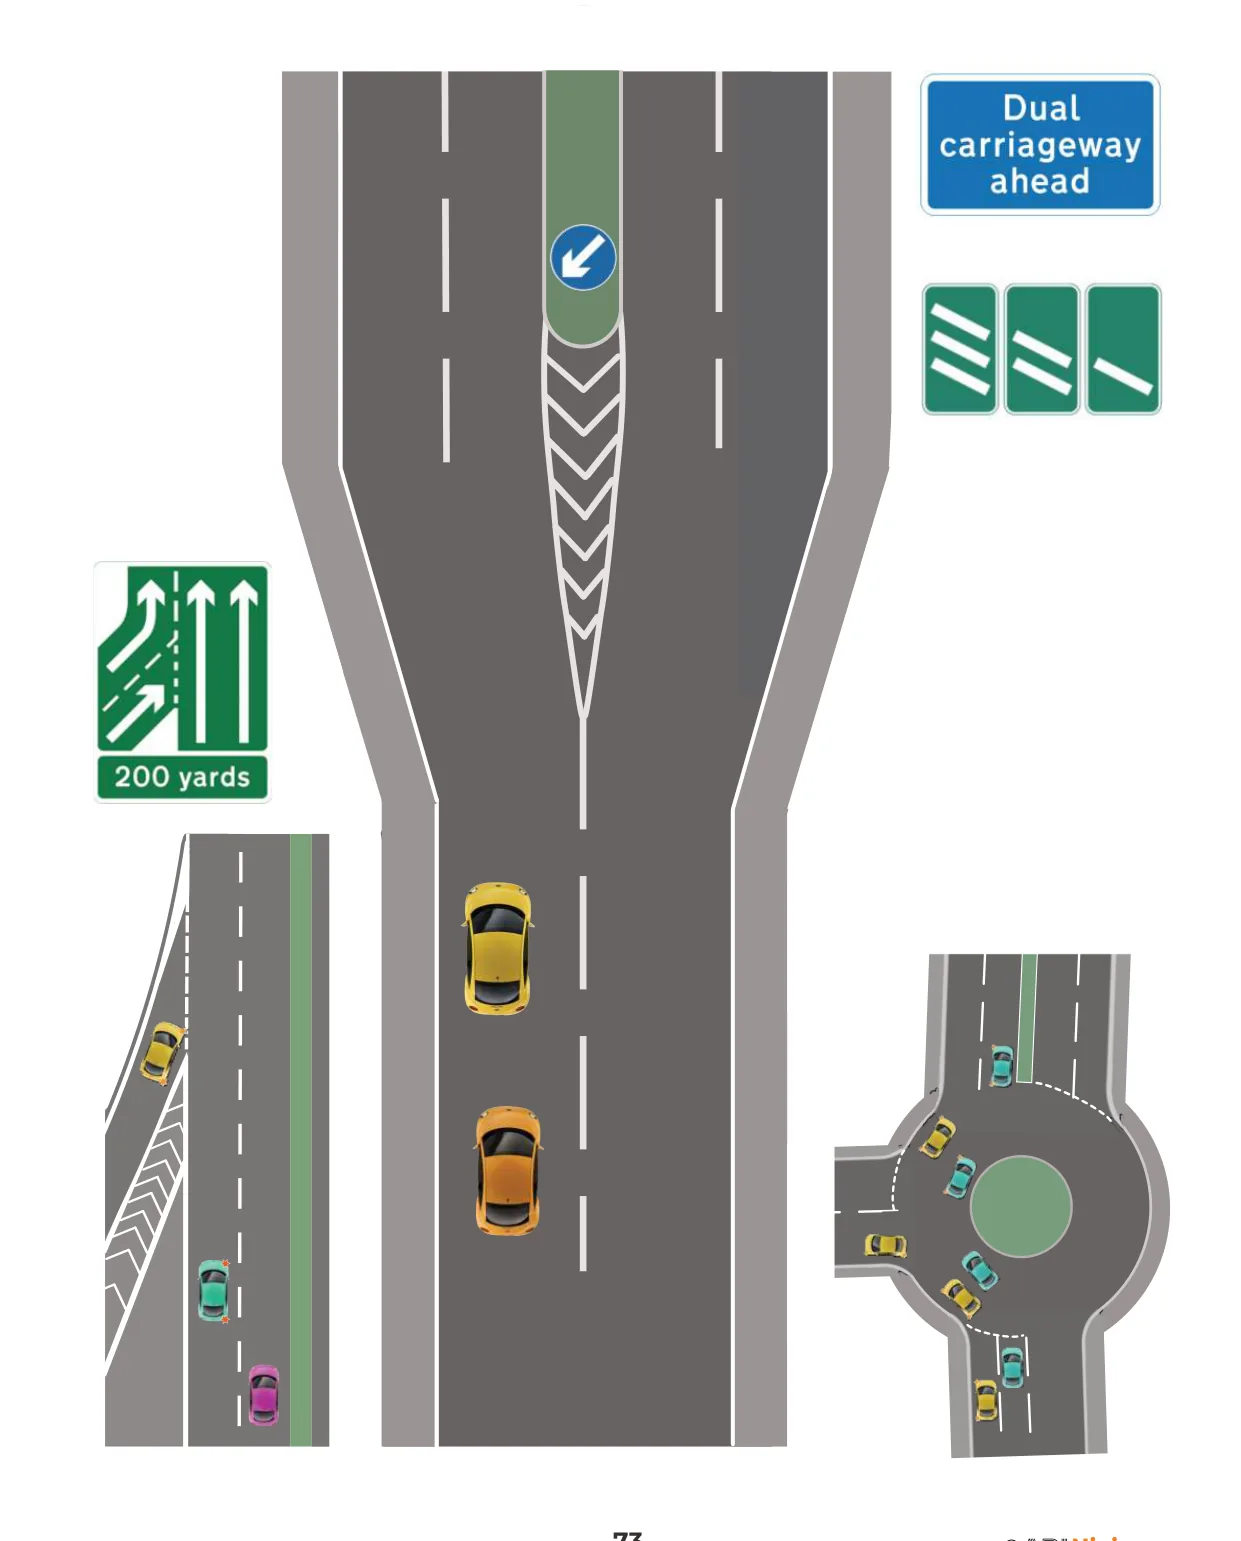
Joining and driving on a dual carriageway.
Key teaching points
Joining: use the slip road to build up to the traffic's speed, check mirrors and blind spot, and merge smoothly into a gap. Give way to traffic already on the carriageway.
Lane discipline: keep to the left lane and use the others only for overtaking, returning left when clear. The right lane is for overtaking, not cruising.
Observation at speed: everything happens faster, so look further ahead, check mirrors more often, and increase your following gap.
Leaving: get into the left lane in good time, signal, and slow down on the slip road, not the carriageway. Check your speed afterwards; you'll feel slower than you are.
Motorway specifics: no learners on motorways until you hold a full licence in some jurisdictions, so check local rules; never stop except in an emergency, and use hard shoulders/refuges only for genuine emergencies.
Reflect
Who has priority, joining traffic or traffic already on the carriageway?
Why should you slow down on the slip road rather than the main road?
Why does your sense of speed mislead you after leaving a fast road?
🚗 On the road: Build confidence on a quiet dual carriageway first; smooth, well-timed merging is the skill examiners and other drivers value most.
✓
LESSON 17
Town, rural, night & all-weather driving
▼
Objective: Adapt your driving to demanding environments: busy towns, open rural roads, darkness and poor weather.
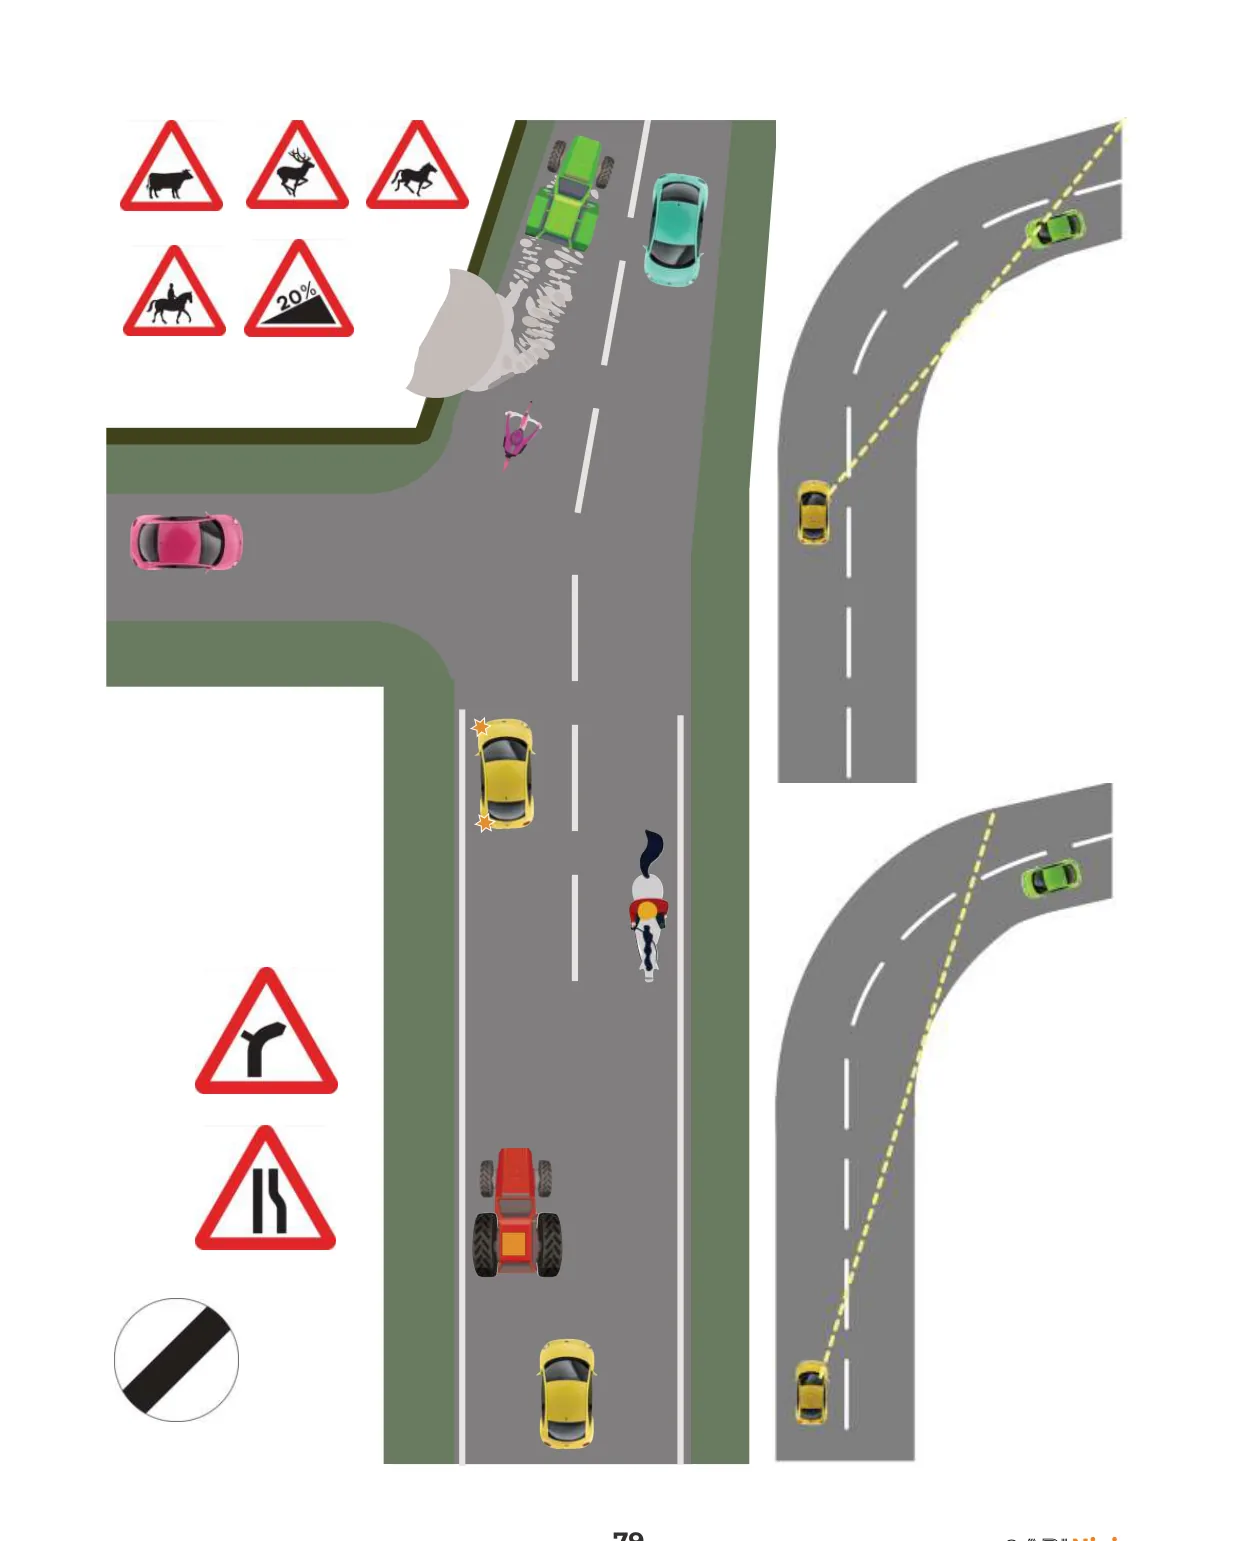
Reading and adapting to rural roads.
Key teaching points
Town & city: constant scanning and planning, frequent mirror use, and patience with buses, loading lorries, cyclists, motorbikes and pedestrians. Use the correct mirror before every turn and read multi-lane junctions early.
Rural roads: expect bends, hidden dips, mud, animals, horse riders and slow farm vehicles; never drive faster than you can stop in the distance you can see to be clear.
Night: drive within the range of your lights, dip for oncoming traffic, and don't dazzle others. Use full beam on dark open roads, dipping early for anyone you meet.
Rain, fog & ice: increase following distance (double in rain, much more in ice), use dipped headlights in poor visibility and fog lights only when visibility is seriously reduced, switching them off again when it lifts.
Eco-driving: smooth gears, gentle gas and reading ahead save fuel and brakes and make you safer at the same time.
Reflect
What does "drive within the range of your lights" mean at night?
When should fog lights go on, and when must they go off?
What hazards are unique to rural roads?
🚗 On the road: Seek out a lesson in the rain and one after dark before your test. They build judgement you can't get on a dry afternoon.
6
Manoeuvres & test readiness
The set manoeuvres, emergency braking practice, and everything you need for test day.
✓
LESSON 18
Turn in the road
▼
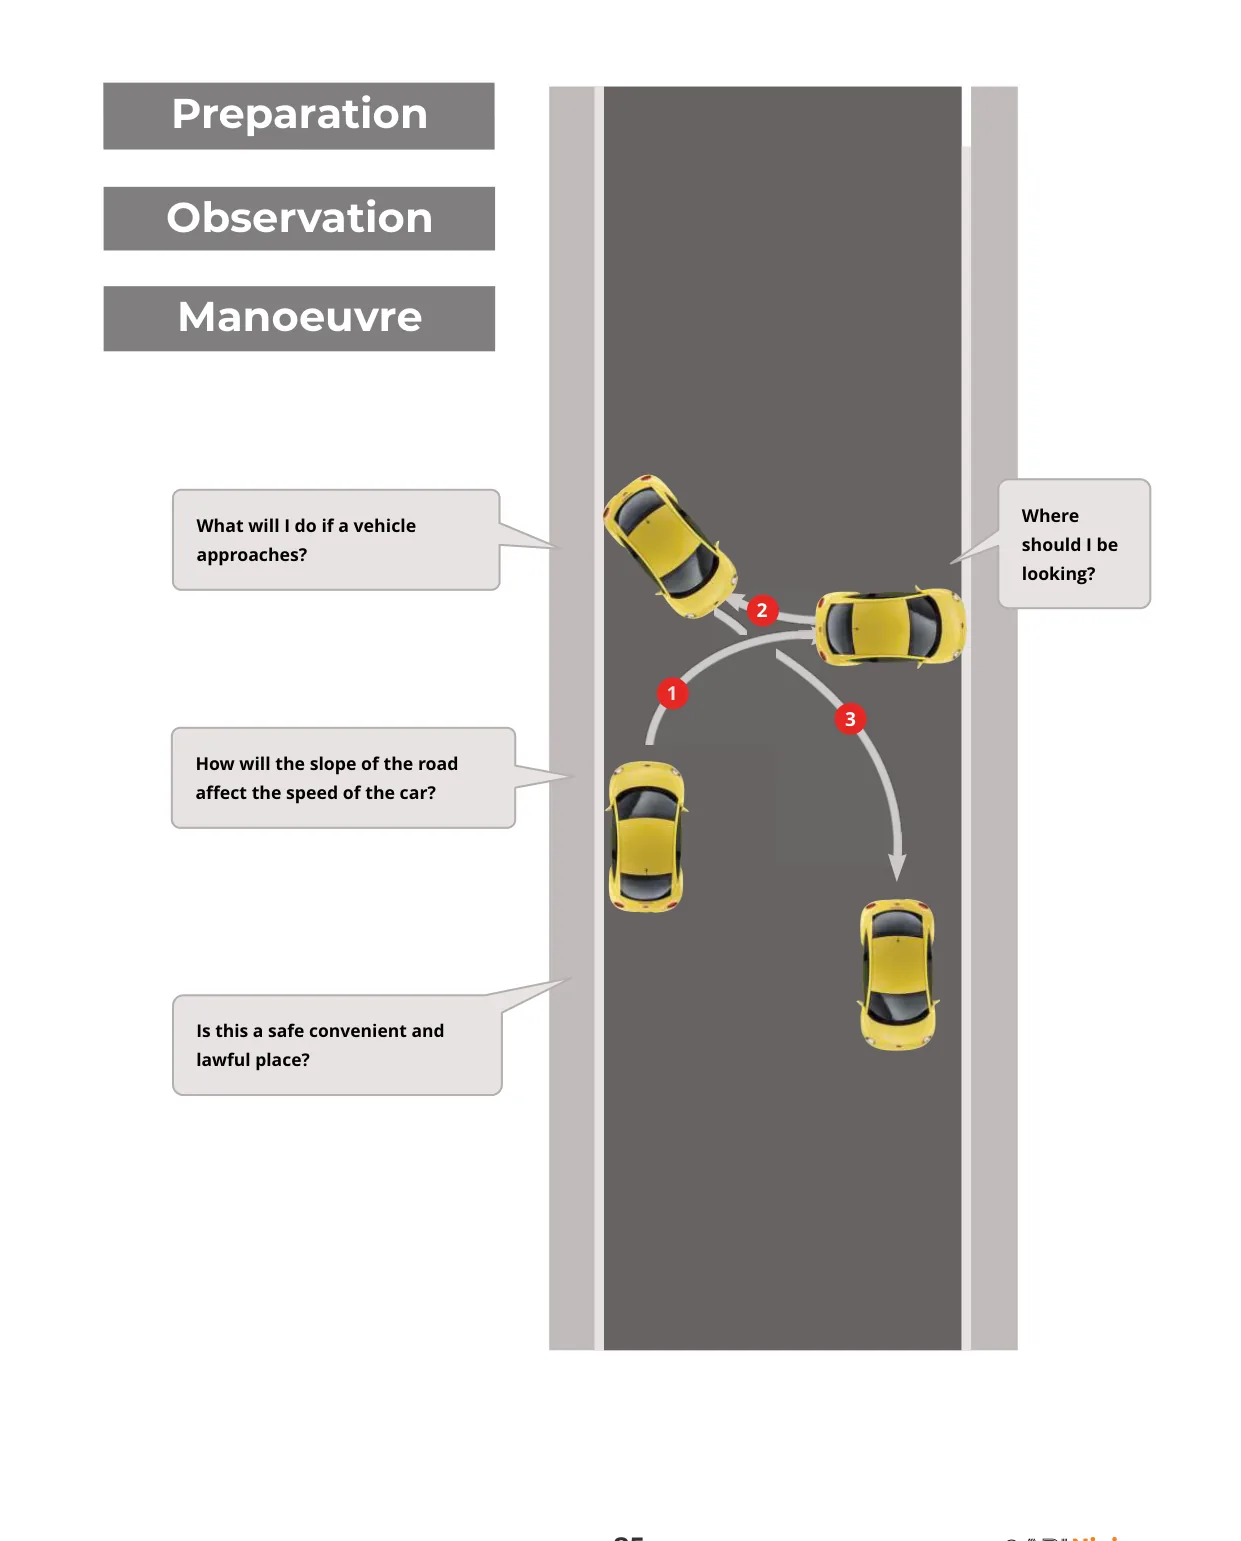
Objective: Turn the car to face the opposite direction using forward and reverse, under full control and with all-round observation.
Turn in the road.
Key teaching points
Choose a safe, legal spot with no driveways or obstructions, and check the whole road is clear before you start.
Control comes from the clutch. Move slowly, steer briskly: full lock toward the kerb on the way forward, full lock the other way as you reverse back.
Observe all round before and during each phase, especially in the direction you're moving; give way to any road user who appears.
It's fine to take more than three moves if the road is narrow; control and safety matter more than the number of turns.
Keep clear of the kerbs; touching or mounting a kerb is a fault.
Reflect
What makes a spot unsuitable for turning in the road?
How do you keep the car slow while steering quickly?
What do you do if another vehicle approaches mid-manoeuvre?
✓
LESSON 19
Reversing & bay parking
▼
Objective: Reverse under control and park accurately in a bay, both driving in forwards and reversing in.
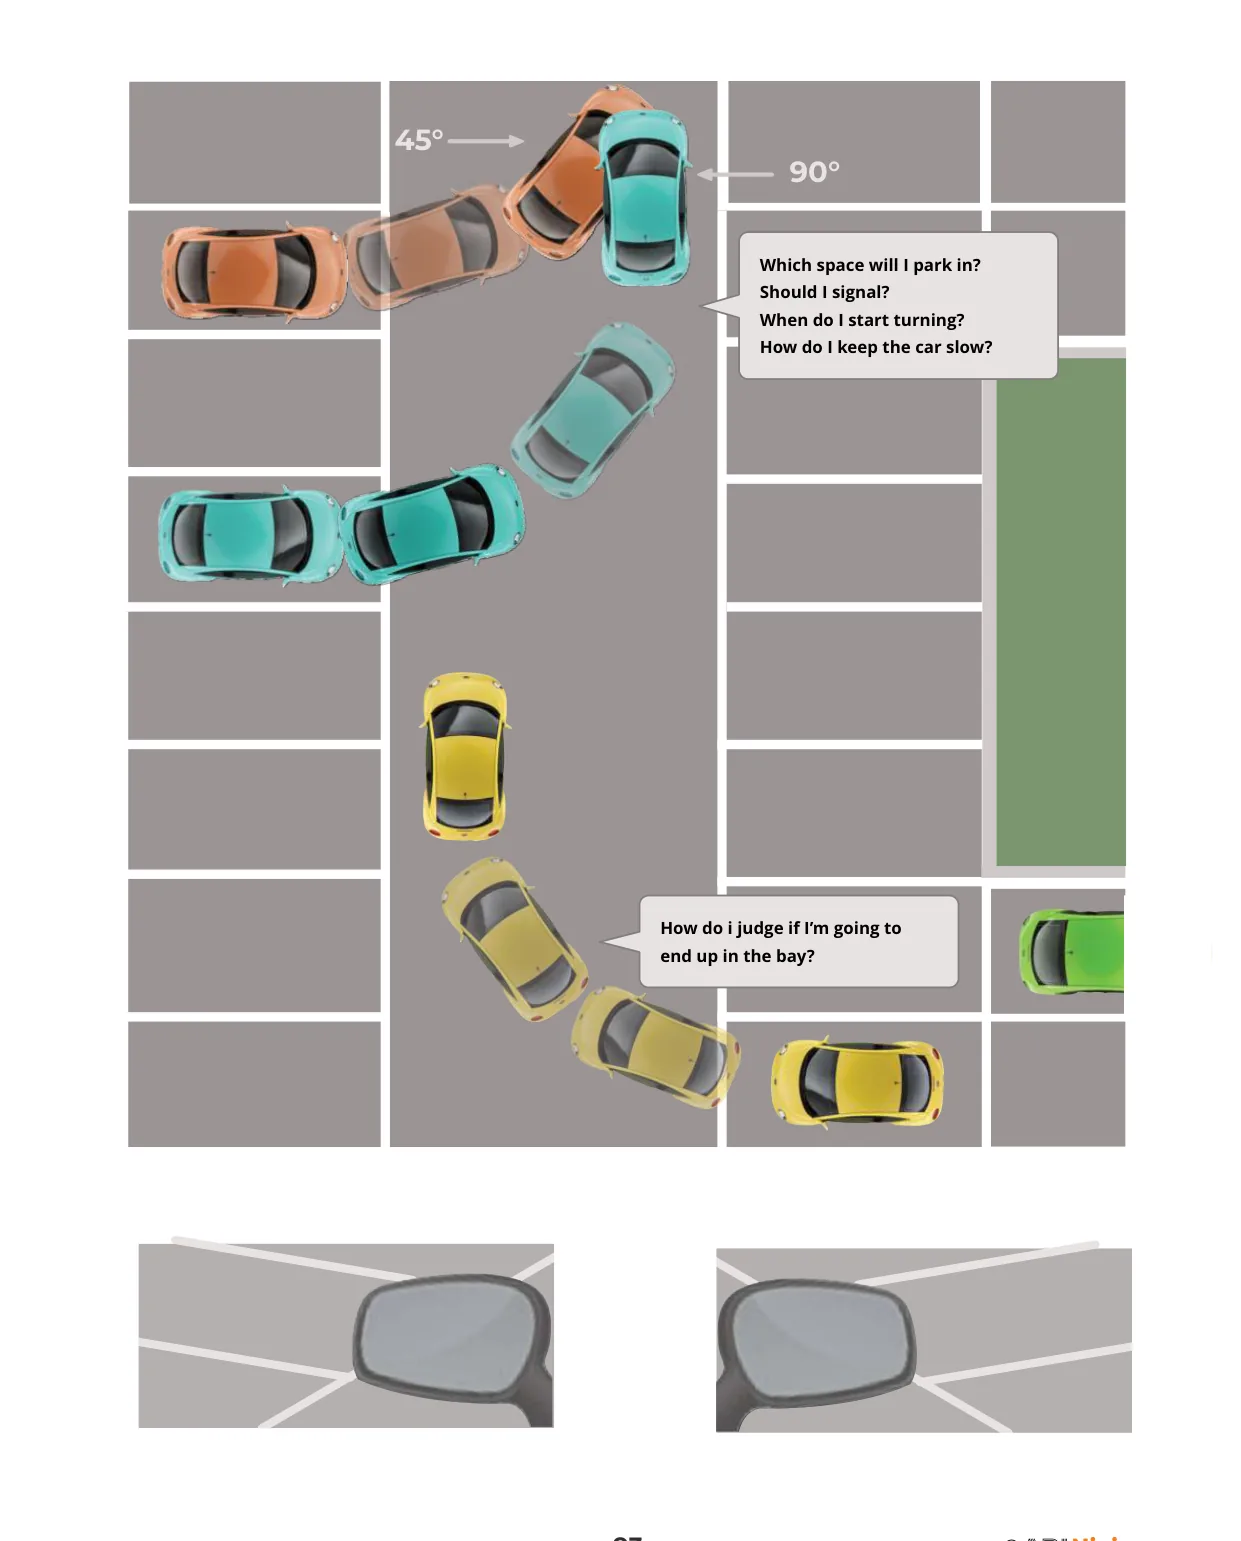
Reverse bay parking.
Key teaching points
Observation is paramount. Look all round before and throughout, and out the rear window when reversing, not just the mirrors.
Reference points (a line appearing in a door mirror, a bay marking lining up with a pillar) make accuracy repeatable, and your instructor will set ones that fit you and the car.
Slow speed, controlled steering via clutch control; if it's going wrong, stop, reassess and correct; even pulling forward to reset is fine.
Reversing in / driving out is generally safer in a car park because you leave facing the traffic.
Finish reasonably central in the bay and within the lines.
Reflect
Why is observation more important than the steering itself here?
Why is reversing into a bay often safer than driving in?
What should you do if the car is ending up crooked?
✓
LESSON 20
Parallel parking
▼
Objective: Park neatly behind a vehicle at the kerb in a space about one and a half car lengths, under control and with full observation.
Parallel parking.
Key teaching points
Pull up roughly level with the parked car, a door's width out, and check all round before reversing.
Reverse slowly, steering toward the kerb as the back of your car swings in, then straighten and bring the front in to finish parallel and close to the kerb.
Reference points tell you when to turn and when to straighten; clutch control keeps the speed walking-pace.
Keep observing all round: give way to passing traffic and pedestrians, pausing if needed.
Finish reasonably close to and parallel with the kerb, without hitting it or the other car.
Reflect
How close to the kerb is "good enough", and why not touching it?
What do you do if a car approaches while you're half-parked?
Why does slow speed make accurate steering easier?
✓
LESSON 21
Pull up on the right & reverse
▼
Objective: Pull up on the right-hand side, reverse a short way and rejoin traffic safely, understanding why this is normally avoided.
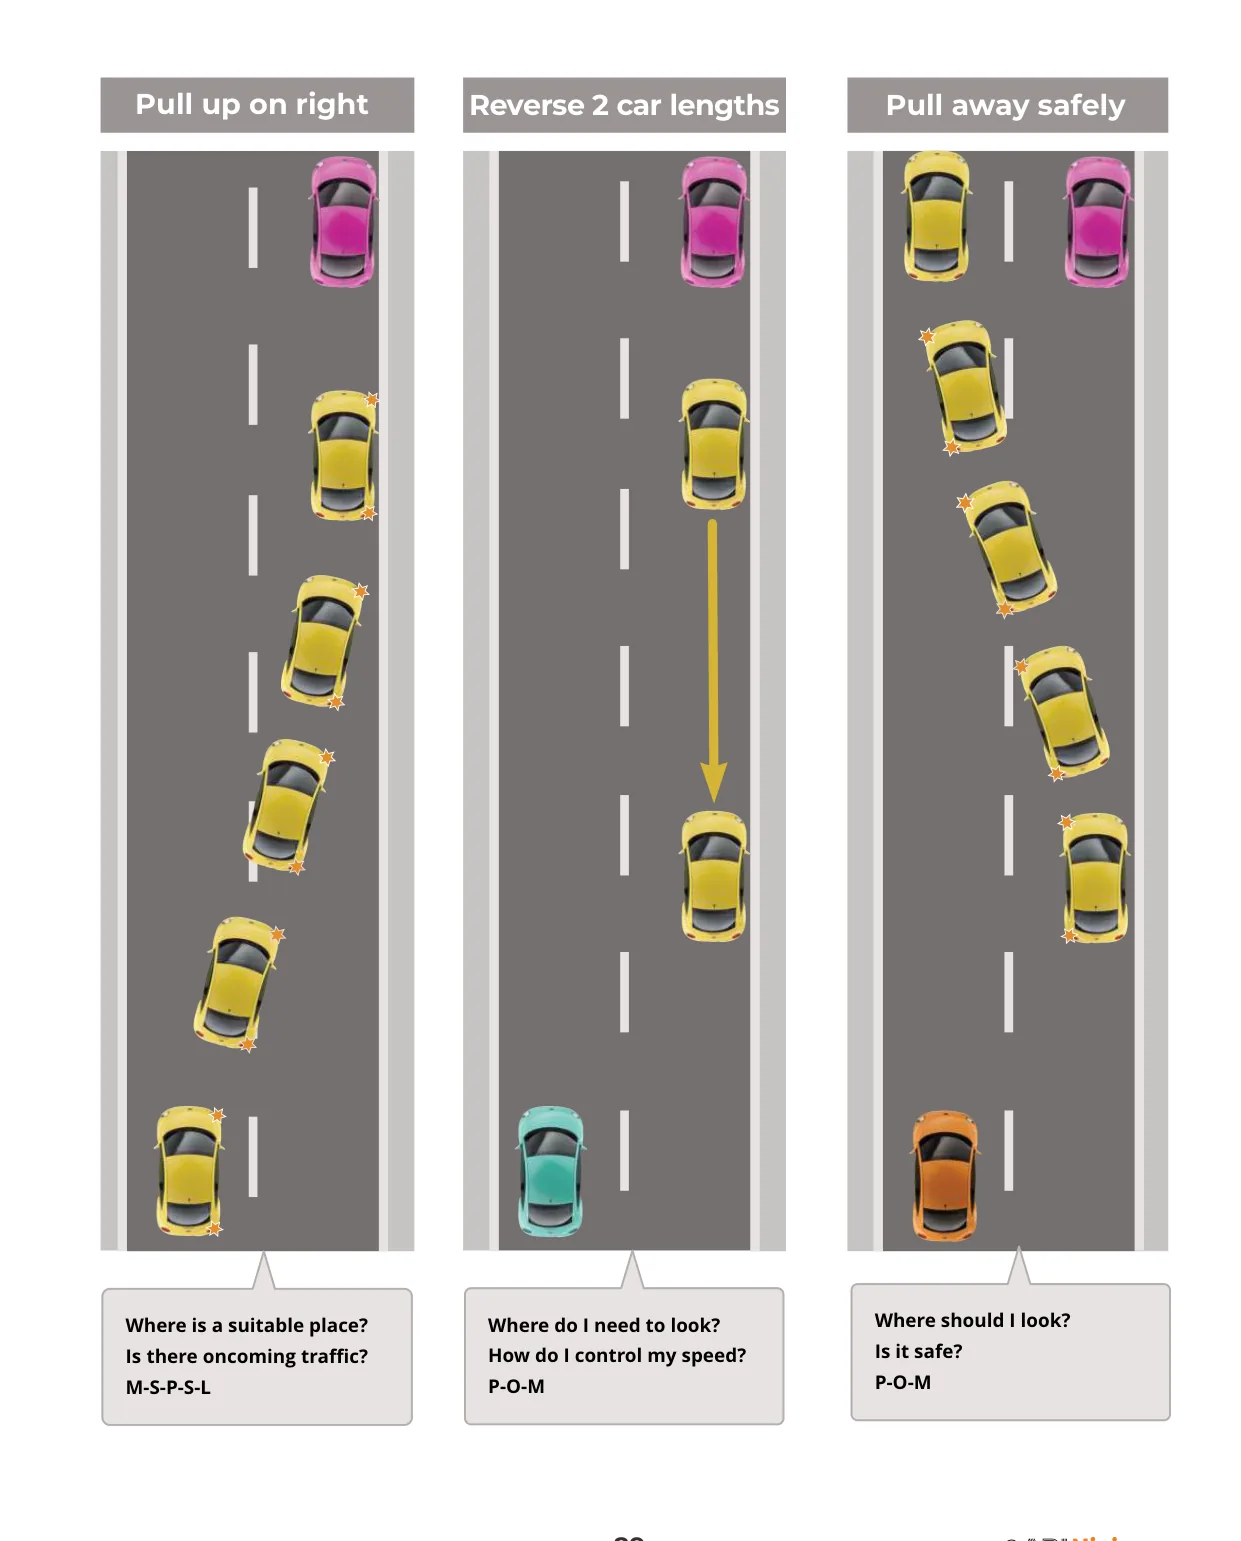
Pull up on the right and reverse.
Key teaching points
Why it's harder: you face oncoming traffic and your view of the road when pulling away is poor, which is exactly why pulling up on the left is preferred.
Use MSPSL to cross to the right and stop close to the kerb, watching oncoming traffic and choosing a clear moment.
Use POM before reversing; keep the speed slow on the clutch and look mainly out the rear window, all round.
You may not park on the right where it's prohibited (e.g. one-way streets aside, on a clearway, or where it would obstruct).
Pulling away again needs extra care and all-round observation because of the limited view across the road.
Reflect
Why is pulling up on the left usually safer?
When might pulling up on the right be appropriate?
What's the danger when pulling away from the right afterwards?
✓
LESSON 22
Emergency stop & skids
▼
Objective: Stop the car promptly and under full control as in an emergency, and understand what causes skids and how to deal with them.
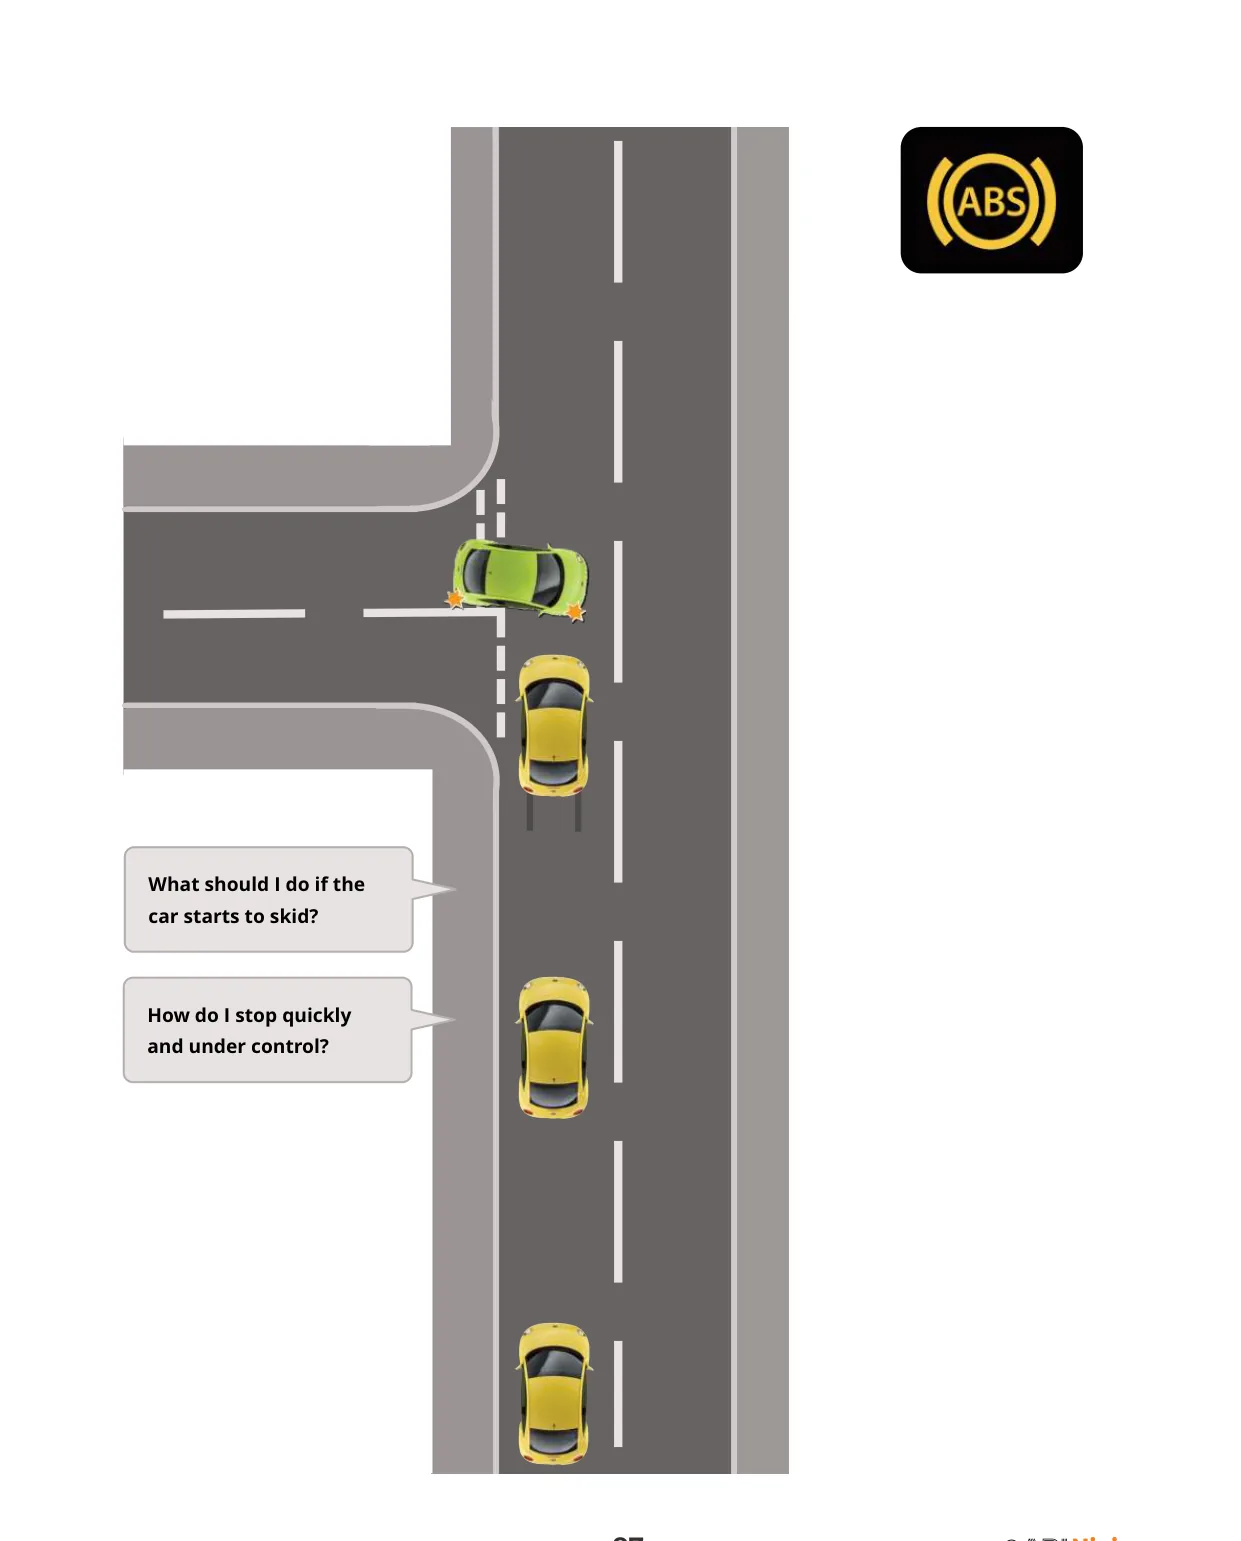
The emergency stop.
Key teaching points
React quickly: brake firmly but not harshly, keeping both hands on the wheel to steer straight. In a manual, clutch down just before stopping to avoid stalling.
No mirror check first. In a genuine emergency, stopping comes first; you check all round before moving off again.
With ABS you can brake hard and steer; you may feel the pedal pulsing, so keep firm pressure on. Without ABS, ease off slightly if a wheel locks.
Skids are caused by the driver: too much speed, harsh braking, steering or acceleration for the grip available. Prevention beats cure: smoothness and the right speed.
If you skid, ease off the brake/gas and steer gently into the direction of the skid to regain grip; apply the parking brake once stopped.
Reflect
Why isn't a mirror check needed before an emergency stop?
How would you know your ABS is working?
What factors make a skid more likely, and how do you prevent one?
🚗 On the road: Your instructor will arrange a safe place to practise; the aim is a stop that's controlled, straight and prompt, and learning to anticipate so you rarely need one.
✓
LESSON 23
Stopping distances
▼
Objective: Understand thinking + braking distance, how they grow with speed and conditions, and why this drives your following gaps.
Braking distance grows far faster than speed: double the speed, roughly four times the braking distance.
Key teaching points
Thinking distance (how far you travel before you react) rises in step with speed, and grows with tiredness, distraction, alcohol or drugs.
Braking distance rises with the square of speed: double your speed and braking distance roughly quadruples.
Conditions multiply it: wet roads can double stopping distance and ice can multiply it many times over, so leave far bigger gaps.
This is the maths behind the two-second rule and your speed choices. You can only stop in the distance you can see to be clear.
Good tyres, brakes and an alert driver all shorten the real-world distance; worn tyres and distraction lengthen it.
Reflect
Why does braking distance grow faster than thinking distance?
What everyday things increase your thinking distance?
How should stopping distance change how far back you sit in traffic?
Test readiness: Show me / Tell me & the marking sheet
▼
Objective: Walk into your test knowing the vehicle safety questions, how the test is marked, and the common faults that catch people out.
Key teaching points
Vehicle safety questions ("tell me" how you'd check / "show me" how you operate) cover brakes, lights, tyres, fluids, steering and demisting. Practise them until you can answer at a glance. See our Tell Me / Show Me and vehicle safety checks pages.
How it's marked: the examiner records driving faults, serious faults and dangerous faults. Too many minor (driving) faults, or any single serious/dangerous fault, fails the test.
Common reasons for failing: observation at junctions, mirror use before signalling/changing direction, steering/positioning, response to signals and signs, and moving off safely: all the routines in this course.
Independent driving tests whether you can follow signs or directions while keeping all your routines going. Practise driving to a destination, not just instructions.
On the day: arrive rested, treat it as a normal drive, and keep your routines running even if you think you've made a mistake. One minor fault is not a fail.
Reflect
What's the difference between a driving, serious and dangerous fault?
Which of this course's routines map onto the top failure reasons?
How is independent driving different from following instructions?
Diagrams and routines build understanding, but real skill comes from time behind the wheel with feedback. Bring this course into your lessons and we'll turn it into a licence.